♥ Welcome ♥

♥ My Blinkie ♥

♥ Little Blue ♥

To View Tag In Proper Size Click On The Tag
Supplies Needed
Scrapkit by Randy's Sin called Always Blue this is PTU Here
Tube of choice im using ©Zindy Nielson This is FTU Tube you can get it Here
Mask WSL_Mask178 at weescotslass Here
Font of choice or the one im using is Mon Amour Script Alt
Lets Get Started
Open new image 650x650
Open rs_3 copy paste as new layer apply mask merge group
Open rs_frame1 copy paste as new layer resize 80 percent with magic wand click in frame selection modify expand by 4
Open rs_4 copy paste as new layer invert delete on keyboard select none drag under frame add gradient glow & add drop shadow to frame
Open rs_potion1 copy paste as new layer resize 70 percent add drop shadow
Open rs_rose2 copy paste as new layer resize 35 percent mirror add drop shadow
Open rs_martini copy paste as new layer resize 45 percent add drop shadow
Open rs_rose3 copy paste as new layer resize 35 percent add drop shadow
Open rs_crystals1 copy paste as new layer resize 52 percent add drop shadow
Open tube copy paste as new layer drag under frame apply blend mode Luminance (L) add drop shadow
Add your name & the words Little Blue Font Mon Amour Script Alt forground #d4daff background #2e3f73 effects add drop shadow
Add your copyright info
resize & save your tag
Love to see your results please email to me so i can put in my show off blog
Thankyou ♥
Written by ©Lyn(akaAngel) 21st July 2011, any similarity to any other tutorial is purely coincidental!

♥ Denim Girl ♥

To View Tag In Proper Size Click On The Tag
Supplies Needed
Scrapkit by Honored Scraps called Denim Daze this is PTU Here
Tube of choice im using ©Keith Garvey i brought my license & tube at MPT all hes tubes are at PTE Here
Mask WSL_Mask84 at weescotslass Here
Font of choice or the one im using is impact & Copper Alt Caps Expert
Lets Get Started
Open new image 650x550
Open hs-denimdaze-Paper8 copy paste as new layer apply mask merge group
Open hs-denimdaze-FramePocket3 copy paste as new layer resize 64 percent with magic wand click in frame selection modify expand by 4
Open hs-denimdaze-Paper3 copy paste as new layer invert delete on keyboard select none drag under frame add drop shadow to frame
Open hs-denimdaze-Flower3 copy paste as new layer resize 35 percent duplicate arrange on tag add drop shadow
Open hs-denimdaze-Blossom3 copy paste as new layer resize 28 percent mirror add drop shadow
Open hs-denimdaze-Butterfly2 copy paste as new layer resize 22 percent duplicate arrange on tag add drop shadow
Open hs-denimdaze-Flourish3 copy paste as new layer resize 44 percent add drop shadow
Open tube copy paste as new layer drag under frame erase whats over lapping blend mode Luminace (L)add drop shadow
Open main tube copy paste as new layer add drop shadow
Add the Words Denim Girl Font impact forground #1b2352 background #ffffff effects inner bevel texture effects weave add gradient glow & add drop shadow
Add your name Font Copper Alt Caps Expert forground #1b2352 background #ffffff add gradient glow & add drop shadow
Add your copyright info
resize & save your tag
Love to see your results please email to me so i can put in my show off blog
Thankyou ♥
Written by ©Lyn(akaAngel) 28th July 2011, any similarity to any other tutorial is purely coincidental!
♥Angel Or Devil ♥

To View Tag In Proper Size Click On The Tag
Supplies Needed
Scrapkit By Stefs Scrapkits called Angel or Devil Here
Tube of choice im using ©Keith Garvey i brought my license & tube at MPT all hes tubes are at PTE Here
Mask WSL_Mask84 at weescotslass Here
Font of choice or the one im using is Anywhere
Lets Get Started
Open new image 650x550
Open Paper05_AngelorDevil_Stef'sScrapkits copy paste as new layer apply mask merge group
Open Frame08_AngelorDevil_Stef'sScrapkits copy paste as new layer resize 67 percent with magic wand click in frame selection modify expand by 4
Open Paper05_AngelorDevil_Stef'sScrapkits copy paste as new layer invert delete on keyboard drag under frame keep selected open tube copy paste as new layer delete on keyboard select none lower opacity 44 this now should be under frame add drop shadow to frame & tube
Open Ribbon04_AngelorDevil_Stef'sScrapkits copy paste as new layer add drop shadow
Open Heart01_AngelorDevil_Stef'sScrapkits copy paste as new layer resize 40 percent add drop shadow
Open Tag01_AngelorDevil_Stef'sScrapkits copy paste as new layer resize 30 percent image rotate 55 right erase slightly see my tag for reference add drop shadow
Add the words Angel or Devil Font Anywhere size 100 pixels background #bf312f forground #000000 add drop shadow
Open Main tube copy paste as new layer add drop shadow
Add your name Font Anywhere size 220 pixels background #bf312f forground #000000 add drop shadow
Add your copyright info
resize & save your tag
Love to see your results please email to me so i can put in my show off blog
Thankyou ♥
Written by ©Lyn(akaAngel) 27th July, any similarity to any other tutorial is purely coincidental!
This is an awesome result by Dixie thankyou♥

♥ Black & White ♥

To View Tag In Proper Size Click On The Tag
Supplies Needed
Scrapkit By JTS Designs Called Black and White this is PTU Here
Tube of choice im using ©Keith Garvey i brought my license & tube at MPT all hes tubes are at PTE Here
Mask WSL_Mask5 at weescotslass Here
Font of choice or the one im using is Rat Infested Mailbox
Lets Get Started
Open new image 650x550
Open JTD_BW_Paper16 copy paste as new layer apply mask merge group duplicate
Open JTD_BW_FrameCluster2 copy paste as new layer resize 40 percent with magic wand click in frames selection modify expand by 4
Open JTD_BW_Paper15 copy paste as new layer invert delete on keyboard drag under frames Open 2 tubes copy paste as new layer arrange in the frames delete on keyboard on each of them add drop shadow to frame & tubes
Open Main Tube copy paste as new layer add drop shadow
Open JTD_BW_Flower8 copy paste as new layer resize 20 percent duplicate 2 times arrange on tag merge them down duplicate mirror add drop shadow
Open JTD_BW_Butterfly1 copy paste as new layer resize 25 duplicate mirror add drop shadow
Add your name Font Rat Infested Mailbox forground #ffffff background #000000 add drop shadow
Add your copyright info
resize & save your tag
Love to see your results please email to me so i can put in my show off blog
Thankyou ♥
Written by ©Lyn(akaAngel) 24th July 2011, any similarity to any other tutorial is purely coincidental!
♥ StickySweet ♥

To View Tag In Proper Size Click On The Tag
Supplies Needed
Scrapkit Called Pour Some Sugar on Me By Artmamas Studio This is FTU Here
Tube of choice im using ©Elias Chatzoudis i brought my license & tube at MPT all hes tubes are at PTE Here
Mask WSL_Mask38 at weescotslass Here
Font of choice or the one im using is Syphon Spritz under handwriting Here
Lets Get Started
Open new image 650x550
Open Artmama-PSSOM 15 copy paste as new layer apply mask merge group effects Enhance
Open Artmama-PSSOM embellie 36 copy paste as new layer with magic wand click in frame selection modify expand by 4
Open Artmama-PSSOM 06 copy paste as new layer invert delete on keyboard select none drag under frame add drop shadow to frame
Open Artmama-PSSOM embellie 26 copy paste as new layer add drop shadow
Open Artmama-PSSOM embellie 21 copy paste as new layer resize 75 percent add drop shadow
Open Artmama-PSSOM embellie 51 copy paste as new layer resize 90 percent drag under frame add drop shadow
Open Artmama-PSSOM embellie 49 copy paste as new layer image rotate 30 left add drop shadow
Open Artmama-PSSOM embellie 50 copy paste as new layer resize 60 percent add drop shadow
Open tube copy paste as new layer add drop shadow
Open Artmama-PSSOM embellie 29 go to layer Sticky layer copy paste as new layer do the same as Sweet layer add drop shadow to both
Add your name Font Syphon Spritz forground #ffffff background #ff95d6 add gradient glow & add drop shadow
Add your copyright info
resize & save your tag
Love to see your results please email to me so i can put in my show off blog
Thankyou ♥
Written by ©Lyn(akaAngel) 24th July 2011, any similarity to any other tutorial is purely coincidental!
♥ In The Out Back ♥

To View Tag In Proper Size Click On The Tag
Supplies Needed
Scrapkit by DesignS By Stina called OutBack Winter this is PTU Here
Mask WSL_Mask84 at weescotslass Here
Font of choice or the one im using is AL Cadence
Lets Get Started
Open new image 650x550
Open DBS_Paper08 copy paste as new layer apply mask merge group
Open DBS_Frame09 copy paste as new layer resize 55 percent with magic wand click in frame selection modify expand by 4
Open DBS_Cloud02 copy paste as new layer invert delete on keyboard Open DBS_Paper02 copy paste as new layer delete on keyboard select none effects texture effects weave this setting 2 2 23 #000000 in both boxes fill gaps checked drag under the cloud add drop shadow to frame
Open DBS_Log copy paste as new layer resize 74 percent add drop shadow
Open DBS_Koala copy paste as new layer resize 60 percent mirror add drop shadow
Open DBS_Tree01 copy paste as new layer add drop shadow
Open DBS_Branch copy paste as new layer resize 51 percent add drop shadow
Open DBS_Horse copy paste as new layer resize 65 percent mirror add drop shadow
Open DBS_Crow copy paste as new layer resize 15 percent place this on the horse add drop shadow
Open DBS_BarbedWireFence copy paste as new layer resize 55 percent sharpen add drop shadow
Open DBS_Barrels copy paste as new layer resize 40 percent add drop shadow
Open tube copy paste as new layer add drop shadow
Add your name & the words In the Out Back Font AL Cadence forground Null background #94675a add gradient glow & add drop shadow
Add your copyright info
resize & save your tag
Love to see your results please email to me so i can put in my show off blog
Thankyou ♥
Written by ©Lyn(akaAngel) 24th July 2011, any similarity to any other tutorial is purely coincidental!
♥ Winter ♥

To View Tag In Proper Size Click On The Tag
Supplies Needed
Scrapkit Called Winter Angels By Artmamas Studio This is FTU Here
Tube of choice im using ©Pinup toons i brought my license & tube at CILM you can now get them at CDO Here
Mask WSL_Mask38 at weescotslass Here
Font of choice or the one im using is Ice-&Snow Here
Lets Get Started
Open new image 650x550
Open Artmama-Winter Angels paper09 copy paste as new layer apply mask merge group effects Enhance
Open Artmama-Winter Angels embell 03 copy paste as new layer add drop shadow
Open Artmama-Winter Angels embell 08 copy paste as new layer resize 55 percent add drop shadow
Open Artmama-Winter Angels embell 43 copy paste as new layer image rotate 30 right add drop shadow
Open Artmama-Winter Angels embell 28 copy paste as new layer resize 75 percent add gradient glow & add drop shadow
Open tube copy paste as new layer add drop shadow
Open Artmama-Winter Angels embell 32 copy paste as new layer apply same mask as before mask merge group effects Enhance repeat with Enhance More
Add your name Font Ice-&Snow forground #ffffff background #000000 add gradient glow & add drop shadow
Add your copyright info
resize & save your tag
Love to see your results please email to me so i can put in my show off blog
Thankyou ♥
Written by ©Lyn(akaAngel) 24th July 2011, any similarity to any other tutorial is purely coincidental!
♥ The OutBack ♥

To View Tag In Proper Size Click On The Tag
Supplies Needed
Scrapkit by TootyPup Scraps called OutBack Winter this is PTU Here
Tube of choice im using ©Popeye Wong Here
Font of choice or the one im using is Mon Amour Script Alt
Lets Get Started
Open new image 650x550
Open summer dayz paper15 copy paste as new layer apply mask merge group duplicate merge down add remove noise 47 random monochrome checked
Open tp-frame-1 copy paste as new layer resize 84 percent with magic wand click in frame selection modify expand by 4
Open tp-paper-03 copy paste as new layer invert delete on keyboard select none drag under frame add drop shadow to frame
Open tp-grass-1 copy paste as new layer add drop shadow
Open tp-outbackSign-4 copy paste as new layer resize 50 percent add drop shadow
tp-flowerDeco-2 copy paste as new layer resize 73 percent image rotate 50 left add drop shadow
Open tp-waterPump-1 copy paste as new layer add drop shadow
Open tp-kingFisher-1 copy paste as new layer resize 35 percent add drop shadowOpen tp-buckets copy paste as new layer resize 45 percent mirror add drop shadow
Open tube copy paste as new layer add drop shadow
Add your name Font Mon Amour Script Alt forground #3f2d18 background #8e5439 add gradient glow add drop shadow
Add your copyright info
resize & save your tag
Love to see your results please email to me so i can put in my show off blog
Thankyou ♥
Written by ©Lyn(akaAngel) 24th July 2011, any similarity to any other tutorial is purely coincidental!
♥ Punky ♥


To View Tag In Proper Size Click On The Tag
Supplies Needed
Scrapkit by Stefs Scrapkits called Punky Black this is PTU Here
Tube of choice im using ©Keith Garvey i brought my license & tube at MPT all hes tubes are at PTE Here
Font of choice or the one im using is Ambitsek & Mr Lackboughs
Lets Get Started
Open new image 583x234
Open Paper08_Punky Black_Stef'sScrapkits go back to the layer select all copy Paper08_Punky Black_Stef'sScrapkits paste into selection select none
Open Element41_Punky Black_Stef'sScrapkits copy paste as new layer add drop shadow
Open Element12_Punky Black_Stef'sScrapkits copy paste as new layer resize 80 percent add drop shadow
Add the words Im A Punk Girl font Ambitsek forground null background #ffffff apply Muras filter meister copies with this setting

Open Element20_Punky Black_Stef'sScrapkits copy paste as new layer resize 40 percent add drop shadow
Open tube copy paste as new layer add drop shadow
image add border with this setting

repeat border change from 4 to 3 & this color #717177
repeat again same as first border
with magic wand click in the grey part of the border add remove noise 84 uniform monochrome checked
Add your name Font Mr Lackboughs forground #ffffff background #000000 add drop shadow
Add your copyright info
Now onto the Avatar
Open new image 150x150 transparent
Open Paper08_Punky Black_Stef'sScrapkits go back to the layer select all copy Paper08_Punky Black_Stef'sScrapkits paste into selection select none
Open Element41_Punky Black_Stef'sScrapkits copy paste as new layer add drop shadow
Open Element12_Punky Black_Stef'sScrapkits copy paste as new layer resize 20 percent add drop shadow
Add the words Im A Punk Girl font Ambitsek forground null background #ffffff apply Muras filter meister copies with this setting
Open Element20_Punky Black_Stef'sScrapkits copy paste as new layer resize 25 percent add drop shadow
Open tube copy paste as new layer add drop shadow
image add border with this setting
repeat border change from 4 to 3 & this color #717177
repeat again same as first border
with magic wand click in the grey part of the border adjust add & remove noise 84 uniform monochrome checked
Add your name Font Mr Lackboughs forground #ffffff background #000000 add drop shadow
Add your copyright info
Love to see your results please email to me so i can put in my show off blog
Thankyou ♥
Written by ©Lyn(akaAngel) 20th July 2011, any similarity to any other tutorial is purely coincidental!
♥ Summer Time ♥

To View Tag In Proper Size Click On The Tag
Supplies Needed
Scrapkit by Stefs Scrapkit called Summer Fun this is PTU Here
Tube of choice im using ©Elias Chatzoudis to purchase hes tubes are at PTE Here
Font of choice or the one im using is Ministry Script
Lets Get Started
Open new image 650x550
Open Frame08_SummerFun_Stef'sScrapkits copy paste as new layer resize 55 percent with magic wand click in frames selection modify expand by 4
Open Paper01_SummerFun_Stef'sScrapkits copy paste as new layer invert delete on keyboard keep selected drag under frame Open Gras_SummerFun_Stef'sScrapkits copy paste as new layer resize 60 percent delete on keyboard select none this should be under frame add drop shadow to frame & grass also add Luminance (L) to grass
Open Lighthouse01_SummerFun_Stef'sScrapkits copy paste as new layer resize 55 percent add drop shadow
Open Wordart04_SummerFun_Stef'sScrapkits copy paste as new layer resize 47 percent add drop shadow
Open Umbrella02_SummerFun_Stef'sScrapkits copy paste as new layer resize 40 percent add drop shadow
Open tube copy paste as new layer drag under frame duplicate erase on both layers any overlapping add drop shadow to bottom tube
Open Beachball02_SummerFun_Stef'sScrapkits copy paste as new layer resize 20 percent add drop shadow
Open resize 15 percent image rotate 20 left add drop shadow
Add your name Font Ministry Script forground #fbfb3b background #455ec6 add drop shadow
Add your copyright info
resize & save your tag
Love to see your results please email to me so i can put in my show off blog
Thankyou ♥
Written by ©Lyn(akaAngel) 20th July 2011, any similarity to any other tutorial is purely coincidental!
♥ SeaSide Fun ♥

To View Tag In Proper Size Click On The Tag
Supplies Needed
Scrapkit by Stefs Scrapkits called Seaside Fun Single this is PTU Here
Tube of choice im using ©Elias Chatzoudis i brought my license & tube at MPT all hes tubes are at PTE Here
Mask WSL_Mask84 at weescotslass Here
Font of choice or the one im using is Satisfaction
Lets Get Started
Open new image 650x550
Open Elements12_SeasideFun_Stef'sScrapkits copy paste as new layer resize 65 percent click in frame with magic wand selection modify expand by 4 Open Paper07_Seaside Fun_Stef'sScrapkits copy paste as new layer invert delete on keyboard drag under frame add drop shadow to frame
Open Elements37_SeasideFun_Stef'sScrapkits copy paste as new layer resize 85 percent
Open Elements30_SeasideFun_Stef'sScrapkits copy paste as new layer resize 52 percent add drop shadow
Open tube copy paste as new layer add drop shadow
Open Elements09_SeasideFun_Stef'sScrapkits copy paste as new layerresize 35 percent image rotate left 5 add drop shadow
Open Elements25_SeasideFun_Stef'sScrapkits copy paste as new layer resize 52 percent add drop shadow
Open Elements29_SeasideFun_Stef'sScrapkits copy paste as new layer resize 35 percent duplicate mirror add drop shadow
Open Elements38_SeasideFun_Stef'sScrapkits copy paste as new layer resize 45 percent add drop shadow
Add your name Font Satisfaction forground #ffffff background #1fd9f3 add drop shadow
Add your copyright info
resize & save your tag
Love to see your results please email to me so i can put in my show off blog
Thankyou ♥
Written by ©Lyn(akaAngel) 20th July 2011, any similarity to any other tutorial is purely coincidental!
♥ Stop ♥

To View Tag In Proper Size Click On The Tag
Supplies Needed
Scrapkit by Stefs Scrapkits called Punky Red this is PTU Here
Tube of choice im using ©Keith Garvey i brought my license & tube at MPT all hes tubes are at PTE Here
Mask WSL_Mask84 at weescotslass Here
Font of choice or the one im using is ft33 & International Palms
Lets Get Started
Open new image 650x550
Open Paper07_Punky Red_Stef'sScrapkits copy paste as new layer apply mask merge group
Open Element11_Punky Red_Stef'sScrapkits copy paste as new layer resize 84 percent click in frame with magic wand selection modify expand by 4 Open Paper09_Punky Red_Stef'sScrapkits copy paste as new layer invert delete on keyboard drag under frame add drop shadow to frame
Open Element41_Punky Red_Stef'sScrapkits copy paste as new layer resize 74 percent drag this under the paper in the frame add drop shadow
Open Element18_Punky Red_Stef'sScrapkits copy paste as new layerdrag under the wire add drop shadow
Open Element03_Punky Red_Stef'sScrapkits copy paste as new layer resize 43 percent add drop shadow
Open Element14_Punky Red_Stef'sScrapkits copy paste as new layer resize 47 percent with font ft33 add the word Stop forground null background #000000
Open Element34_Punky Red_Stef'sScrapkits copy paste as new layer resize 30 percent add drop shadow
Open tube copy paste as new layer add drop shadow
Add your name Font International Palms forground #Null background #ffffff add drop shadow
Add your copyright info
resize & save your tag
Love to see your results please email to me so i can put in my show off blog
Thankyou ♥
Written by ©Lyn(akaAngel) 20th July 2011, any similarity to any other tutorial is purely coincidental!
♥ Pirates Life ♥

To View Tag In Proper Size Click On The Tag
Supplies Needed
ScrapKit by kaccii FTU Here
Tube of choice im using ©Elias Chatzoudis i brought my license & tube at MPT all hes tubes are at PTE Here
Mask WSL_Mask38 at weescotslass Here
Font of choice or the one im using is A&S Snapper Script & Carpenter Script
Lets Get Started
Open new image 650x550
Open Summer holiday - paper (6) copy paste as new layer resize 20 percent apply mask merge group effects enhance duplicate
Open Summer holiday- element (43) copy paste as new layer resize 55 percent with magic wand click in frame selection modify expand by 4
Open Summer holiday - paper (8) copy paste as new layer resize 15 percent invert delete on keyboard select none drag under frame add drop shadow to frame
Open Summer holiday- element (47) copy paste as new layer resize 40 percent add drop shadow
Open Summer holiday- element (5) copy paste as new layer resize 85 percent resize again at 71 percent mirror add drop shadow
Open Summer holiday- element (1) copy paste as new layer resize 44 percent lower opacity 71 add drop shadow
Open Summer holiday- element (38) copy paste as new layer
Open Summer holiday- element (20) copy paste as new layer resize 45 percent add drop shadow
Open Summer holiday- element (18) copy paste as new layer resize 50 percent add drop shadow
Open Summer holiday- element (21) copy paste as new layer resize 43 percent add drop shadow
Open tube copy paste as new layer add drop shadow
Add your name Font A&S Snapper Script forground #37703d background #f3969e add drop shadow click in each letter of your name with magic wand adjust add remove noise 47 uniform monochrome checked
Add the words Pirates Life Font Carpenter Script forground #37703d background #f3969e add drop shadow
Add your copyright info
resize & save your tag
Love to see your results please email to me so i can put in my show off blog
Thankyou ♥
Written by ©Lyn(akaAngel) 19th July 2011, any similarity to any other tutorial is purely coincidental!
♥ Sweet Girl ♥

To View Tag In Proper Size Click On The Tag
Supplies Needed
Scrapkit by dnscraps called Small pink emotion this is PTU Here
Tube of choice im using ©Keith Garvey can purchase the Tube Here
Mask WSL_Mask84 at weescotslass Here
Font of choice or the one im using is Do I like Stripes?
Lets Get Started
Open new image 650x550
Open Smallpinkemotionspaper4 copy paste as new layer apply mask merge group
Open smallpinkemotionspearlflowers2 copy paste as new layer resize 70 percent blend mode Burn add drop shadow
Open smallpinkemotionswordart copy paste as new layer resize 70 percent add gradient glow & add drop shadow
Open smallpinkemotionsrosess copy paste as new layer resize 55 percent duplicate mirror add drop shadow
Open smallpinkemotionskeys copy paste as new layer resize 55 percent add drop shadow
Open smallpinkemotionsspackles copy paste as new layer effects Enhance
Open tube copy paste as new layer add drop shadow
Add your name Font Do I like Stripes? forground #f97dac background #ffffff add gradient glow & add drop shadow
Add your copyright info
resize & save your tag
Love to see your results please email to me so i can put in my show off blog
Thankyou ♥
Written by ©Lyn(akaAngel) 18th July 2011, any similarity to any other tutorial is purely coincidental!
♥ Summer Lovin ♥

To View Tag In Proper Size Click On The Tag
Supplies Needed
Scrapkit by Designed by Stina called Summer Lovin this is PTU Here
Tube of choice im using ©Elias Chatzoudis i brought my license & tube at MPT all hes tubes are at PTE Here
Mask WSL_Mask84 at weescotslass Here
Font of choice or the one im using is Buffet Script
Lets Get Started
Open new image 650x550
Open DBS_Paper17 copy paste as new layer apply mask merge group add remove noise 47 random monochrome checked
Open DBS_Frame10 copy paste as new layer resize 64 percent with magic wand click in frame selection modify expand by 4
Open DBS_Paper4 copy paste as new layer invert delete on keyboard drag under frame under the frame add drop shadow to frame
Open DBS_Waves copy paste as new layer drag under frame erase parts overlapping
Open DBS_WordArt02 copy paste as new layer resize 75 percent add gradient glow & add drop shadow
Open DBS_BeachChair01 copy paste as new layer resize 70 percent add drop shadow
Open DBS_Shake01 copy paste as new layer resize 35 percent add drop shadow
Open DBS_Starfish copy paste as new layer resize 30 percent add drop shadow
Open DBS_Seagull copy paste as new layer resize 25 percent duplicate add drop shadow
Open DBS_Sunglasses01 copy paste as new layer resize 25 percent image rotate 20 right add drop shadow
Open tube copy paste as new layer add drop shadow
Add your name Font Buffet Script forground Null background #000000 effects add gradient glow & add drop shadow
Add your copyright info
resize & save your tag
Love to see your results please email to me so i can put in my show off blog
Thankyou ♥
Written by ©Lyn(akaAngel) 15th July 2011, any similarity to any other tutorial is purely coincidental!
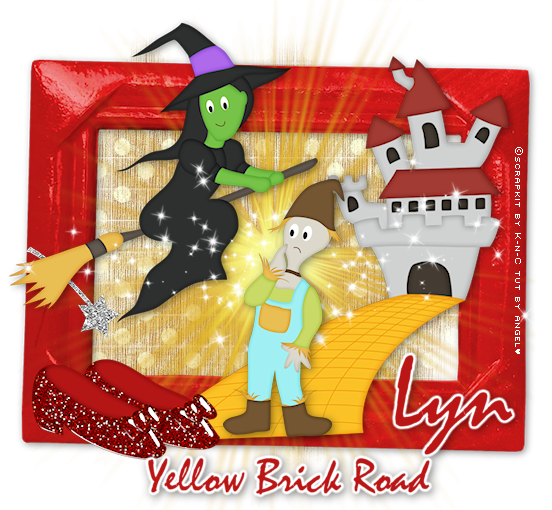
♥ Yellow Brick Road ♥
To View Tag In Proper Size Click On The Tag
Supplies Needed
Scrapkit by K-n-C called To see the Wizard this is PTU Here
Mask WSL_Mask84 at weescotslass Here
Font of choice or the one im using is Mistral
Lets Get Started
Open new image 650x550
Open pp10 copy paste as new layer apply mask merge group
Open frame copy paste as new layer resize 75 percent add drop shadow
open sun copy paste as new layer resize 65 percent
Open castle copy paste as new layer resize 45 percent add drop shadow
Open rubyslippers copy paste as new layer resize 39 percent mirror adjust sharpen add drop shadow
Open wickedwitch copy paste as new layer resize 35 percent add drop shadow
Open sparklestars copy paste as new layer resize 58 percent add drop shadow
Open scarecrow copy paste as new layer resize 35 percent add drop shadow
Add your name & the words Yellow Brick Road Font Mistral forground NULL background #bb1616 add gradient glow & add drop shadow
Add your copyright info
resize & save your tag
Love to see your results please email to me so i can put in my show off blog
Thankyou ♥
Written by ©Lyn(akaAngel) 15th July 2011, any similarity to any other tutorial is purely coincidental!
♥ Fun with Sprite ♥
To View Tag In Proper Size Click On The Tag
Supplies Needed
Scrapkit by puddicat creations called Fun With Sprite this is PTU Here
Mask WSL_Mask84 at weescotslass Here
Font of choice or the one im using is Do I like Stripes?
Lets Get Started
Open new image 650x550
Open pdc_leaves1 copy paste as new layer add drop shadow
Open pdc_frame2 copy paste as new layer resize 85 percent with magic wand click in frame selection modify expand by 4
Open pdc_paper3 copy paste as new layer invert delete on keyboard keep selected open pdc_fence1 copy paste as new layer delete on keyboard drag under frame lower opacity 53 percent add drop shadow
Open pdc_mushroom2 copy paste as new layer resize 65 percent add drop shadow
Open pdc_leaves5 copy paste as new layer add drop shadow
Open pdc_butterfly3 copy paste as new layer resize 45 percent add drop shadow
Open pdc_ladybug1 copy paste as new layer resize 50 percent add drop shadow
Open sm_sprite1_2 copy paste as new layer resize 90 percent add drop shadow
Add your name & the words Fun With Sprite Font Do I like Stripes? forground #de4662 background #f77ba5 add drop shadow
Add your copyright info
resize & save your tag
Love to see your results please email to me so i can put in my show off blog
Thankyou ♥
Written by ©Lyn(akaAngel) 11th July 2011, any similarity to any other tutorial is purely coincidental!
♥ Little Bit Country ♥

To View Tag In Proper Size Click On The Tag
Supplies Needed
Scrapkit by Tonie Posers called Autumn Falls this is PTU Here
Tube of choice im using ©Popeye Wong this is a FTU Tube Here
Mask WSL_Mask84 at weescotslass Here
Font of choice or the one im using is P22Broadwindsor
Lets Get Started
Open new image 650x550
Open autumn falls paper 2 copy paste as new layer apply mask merge group
Open autumn falls frame 6 copy paste as new layer resize 64 percent with magic wand click in frame selection modify expand by 4
Open autumn falls paper 18 copy paste as new layer invert delete on keyboard select none drag under frame add drop shadow to frame
Open autumn falls wheel copy paste as new layer resize 65 percent add drop shadow
Open autumn falls trelis copy paste as new layer resize 67 percent add drop shadow
Open open autumn falls butterflys1 copy paste as new layer add drop shadow
Open autumn falls bridge copy paste as new layer resize 44 percent drag under frame add drop shadow
Open autumn falls basket 2 copy paste as new layer resize 55 percent
Open autumn falls rocker copy paste as new layer resize 75 percent add drop shadow
Open tube copy paste as new layer add drop shadow
Add your name Font P22Broadwindsor forground #593213 background #a37d4e add drop shadow
Add your copyright info
resize & save your tag
Love to see your results please email to me so i can put in my show off blog
Thankyou ♥
Written by ©Lyn(akaAngel) 11th July 2011, any similarity to any other tutorial is purely coincidental!
♥ Cowgirls Dont Cry ♥

To View Tag In Proper Size Click On The Tag
Supplies Needed
Scrapkit by Honey Designs called Wild Wild West this is FTU Here
Tube of choice im using ©Elias Chatzoudis i brought my license & tube at MPT all hes tubes are at PTE Here
Mask WSL_Mask84 at weescotslass Here
Font of choice or the one im using is Shadowed Serif & P22 Hopper Edward
Lets Get Started
Open new image 650x550
Open Honey_Designs_Wild_Wild_West_44 copy paste as new layer resize 55 percent apply mask merge group
Open Honey_Designs_Wild_Wild_West_37 copy paste as new layer resize 55 percent with magic wand click in frame selection modify expand by 4
Open Honey_Designs_Wild_Wild_West_45 copy paste as new layer resize 45 percent invert delete on keyboard select none drag under frame add drop shadow to frame
Open Honey_Designs_Wild_Wild_West_29 copy paste as new layer resize 45 percent drag under frame lower opacity to 30
Open Honey_Designs_Wild_Wild_West_20 copy paste as new layer resize 25 percent add drop shadow
Open Honey_Designs_Wild_Wild_West_7 copy paste as new layer resize 15 percent add drop shadow
Open Honey_Designs_Wild_Wild_West_4 copy paste as new layer resize 15 percent add drop shadow
Open Honey_Designs_Wild_Wild_West_17 copy paste as new layer resize 15 percent add drop shadow
Open Honey_Designs_Wild_Wild_West_3 copy paste as new layer resize 20 percent add drop shadow
Open tube copy paste as new layer drag tube under frame duplicate send this to top erase any over lapping add drop shadow to bottom tube
Add the words Cowgirls Dont Cry Font Shadowed Serif forground #5d363b background #cc9666 add drop shadow
Add your name Font P22 Hopper Edward forground #cc9666 background #5d363b add drop shadow
Add your copyright info
resize & save your tag
Love to see your results please email to me so i can put in my show off blog
Thankyou ♥
Written by ©Lyn(akaAngel) 4th July 2011, any similarity to any other tutorial is purely coincidental!
Another example below using Tube from Keith Garvey you will find hes tubes at PTE also

♥ Lyn's Cafe ♥

Supplies Needed
Scrapkit by honeydesigns called Honey Art Cafe
This is FTU can be downloaded
Here
Mask WSL_Mask84 at weescotslass
Here
Tube of choice the Tube im using is ©Michelle Soneja i got this is in the FTU section at MPT you need proper licence to use this tube
Here
The Tube is no longer there im sorry but any tube of your choice will work with this tut as ive seen some amazing results
xero porcelian
Font of choice or the one i have used Noir-et-Blanc
Lets get started
Open 750x650 Open coffee resize 20 apply maske merge group duplicate move this to right & down a bit
Grab your preset tool circle width 11.09 make circle in middle of tag forground #58473d background null
Open papercafe copy paste as new layer resize 15 percent selection invert delete add drop shadow to frame add gradient glow white
Open swirls and hearts copy paste as new layer resize 35 percent duplicate merge down add drop shadow
Open resize 28 percent then again at 70 percent sharpen sharpen more add drop shadow
Open red cupcakes resize 10 percent sharpen add drop shadow place on table
Open Menu Board copy paste as new layer resize 28 percent then again at 80 percent sharpen sharpen more add drop shadow
Open your tube copy paste as new layer mirror erase little that is hanging over on bottom
Preset tool callout1 this is in psp width 2 forground #58473d background NULL add gradient glow add drop shadow click in middle modify expand by 1 open pinky copy paste as
new layer resize 11 percent move paper over callout selection invert move paper under callout
Add your name & the word Cafe font Noir-et-Blanc forground #58473d background null add drop shadow & gradient glow white
merge visible apply xero porceilian default settings
Add your copyright info
Love to see your results please email to me so i can put in my show off blog
Thankyou ♥
♥ Sexy Beautiful ♥

To View Tag In Proper Size Click On The Tag
Supplies Needed
Scrapkit by randyssin called Dark Love this is FTU you can download kit from Here
Tube of choice im using ©Ismael Rac can purchase tube from Here
Template44 by Becky this is FTU you can grab it Here
Mask WSL_Mask84 at weescotslass Here
Font of choice or the one im using is Satisfaction
Lets Get Started
Open template duplicate close the original canvas size 650 x 600 delete Preview layer & TOU Layer & white background layer
Open rs_paper15 copy paste as new layer resize 25 percent apply mask merge group send this to bottom
Go To background circle select all float defloat Open rs_paper4 copy paste as new layer select invert delete on keyboard select none add drop shadow
Go To circle select all float defloat Open rs_paper11 copy paste as new layer select invert delete on keyboard select none
Go to square background select all float defloat Open rs_paper2 copy paste as new layer select invert delete on keyboard Open tube copy paste as new layer delete on keyboard select none add drop shadow to tube
Go to square frame select all float defloat Open rs_paper4 copy paste as new layer select invert delete on keyboard select none add drop shadow
Go to rectangle background select all float defloat Open rs_paper4 copy paste as new layer select invert delete on keyboard open tube copy paste as new layer delete on keyboard select none blend mode burn add drop shadow to tube
Go to rectangle frame select all float defloat Open rs_paper2 copy paste as new layer select invert delete on keyboard select none add drop shadow
Go To Beautiful select all float defloat Open rs_paper15 copy paste as new layer select invert delete on keyboard select none add gradient glow & add drop shadow
Go To Sexy select all float defloat Open rs_paper4 copy paste as new layer select invert delete on keyboard select none add gradient glow & add drop shadow
Open rs_rose13 copy paste as new resize 55 percent image rotate 20 left drag under beautiful layer add drop shadow
Open rs_rose5 copy paste as new layer resize 44 percent add drop shadow
Open rs_plainballoon1 copy paste as new layer resize 45 percent add drop shadow
Add your name Font Satisfaction forground #000000 background #83030d add gradient glow & add drop shadow
Add your copyright info
resize & save your tag
Love to see your results please email to me so i can put in my show off blog
Thankyou ♥
Written by ©Lyn(akaAngel) 4th July 2011, any similarity to any other tutorial is purely coincidental!
♥ Carefree Summer ♥

To View Tag In Proper Size Click On The Tag
Supplies Needed
Scrapkit by horseplayspasture called Care Free Summer this is FTU Here
Tube of choice im using ©Elias Chatzoudis i brought my license & tube at MPT all hes tubes are at PTE Here
Mask WSL_Mask38 & 84at weescotslass Here
Font of choice or the one im using is Missiva
Lets Get Started
Open new image 650x550
Open Paper 11 copy paste as new layer apply mask 38 merge group duplicate merge down add remove noise 47 Uniform monochrome checked
Open CS- Chicken Wire copy paste as new layer apply mask 84 merge group
Open CS - Frame 5 copy paste as new layer resize 64 percent with magic wand click in frame selection modify expand by 4
Open Paper 10 copy paste as new layer invert delete on keyboard select none drag under frame add drop shadow to frame
Open CS - Barbed Heart 2 copy paste as new layer resize 85 percent add drop shadow
Open CS - Birdhouse copy paste as new layer resize 85 percent add drop shadow
Open CS - Deco Flower 2 copy paste as new layer resize 55 percent add drop shadow
Open CS - Bird copy paste as new layer resize 35 percent mirror add drop shadow
Open CS - Doodle 2 copy paste as new layer select all float defloat Open paper 5 copy paste as new layer invert delete on keyboard delete original doodle add gradient glow & drop shadow drag under birdhouse
Open CS - Butterfly 1 copy paste as new layer resize 25 percent image rotate 20 right effects enhance add drop shadow duplicate mirror resize 85 percent adjust sharpen
Open tube copy paste as new layer add drop shadow
Add your name Font Missiva forground #1c83ad background #ffd7d3 add gradient glow & add drop shadow
Add your copyright info
resize & save your tag
Love to see your results please email to me so i can put in my show off blog
Thankyou ♥
Written by ©Lyn(akaAngel) 4th July 2011, any similarity to any other tutorial is purely coincidental!
♥ Candy Treats ♥

To View Tag In Proper Size Click On The Tag
Supplies Needed
Scrapkit by Tonie Posers called Peppermint Candy this is PTU Here
Tube of choice im using ©Elias Chatzoudis i brought my license & tube at MPT all hes tubes are at PTE Here
Template106 by Becky this is FTU you can grab it Here
Mask WSL_Mask84 at weescotslass Here
Font of choice or the one im using is DrumagStudioNF & PetraScriptEF-Alternate
Lets Get Started
Open template duplicate close the original canvas size 650 x 600 delete raster1 layer & white background layer
Open peppermint candy paper 14 copy paste as new layer resize 25 percent apply mask merge group send this to bottom
Go To rectangle scallop select all float defloat Open peppermint candy paper 7 copy paste as new layer resize 110 percent select invert delete on keyboard select none add drop shadow
Go To rectangle2 select all float defloat Open peppermint candy paper 12 copy paste as new layer select invert delete on keyboard select none
Go to rectangle1 background select all float defloat Open peppermint candy paper 9 copy paste as new layer select invert delete on keyboard select none add drop shadow
Go to rectangle1 select all float defloat Open peppermint candy paper 11 copy paste as new layer select invert delete on keyboard select none add drop shadow
Go to circle scallop select all float defloat Open peppermint candy paper 9 copy paste as new layer select invert delete on keyboard select none add drop shadow
Go to circle select all float defloat Open peppermint candy paper 12 copy paste as new layer select invert delete on keyboard select none
Go to frame fill select all float defloat Open peppermint candy paper 5 copy paste as new layer select invert delete on keyboard select none add drop shadow
Go to frame select all float defloat Open peppermint candy paper 7 copy paste as new layer select invert delete on keyboard select none add drop shadow
Open peppermint candy smarties copy paste as new layer drag above mask layer add drop shadow
Open peppermint candy jar 2 copy paste as new layer resize 44 percent add drop shadow
Open peppermint candy candy lolly 4 copy paste as new layer resize 45 percent image rotate 20 left add drop shadow
Open peppermint candy candy flumps copy paste as new layer drag above smarties add drop shadow
Open peppermint candy cupcake 2 copy paste as new layer resize 10 percent add drop shadow
Open tube copy paste as new layer add drop shadow
Add the words Candy Treats Font DrumagStudioNF forground #fe8187 background #1f64a4 effects texture effects weave then add gradient glow & add drop shadow
Add your name Font PetraScriptEF-Alternate forground #fe8187 background #1f64a4 effects texture effects weave then add gradient glow & add drop shadow
Add your copyright info
resize & save your tag
Love to see your results please email to me so i can put in my show off blog
Thankyou ♥
Written by ©Lyn(akaAngel) 3rd July 2011, any similarity to any other tutorial is purely coincidental/Div>
♥ Summer ♥

To View Tag In Proper Size Click On The Tag
Supplies Needed
Scrapkit by By Creative Scraps by Crys called Sunset Summer this is PTU Here
Tube of choice im using ©Keith Garvey at PTE Here
Font of choice or the one im using is Pea Biggio
Lets Get Started
Open new image 650x550
Open frame1 copy paste as new layer resize 75 percent with magic wand click in frame selection modify expand by 4
Open paper12 copy paste as new layer invert delete on keyboard select none drag under frame add drop shadow to frame
Open Palm Tree silouette copy paste as new layer drag under frame add drop shadow
Open shell2 copy paste as new layer resize 40 percent image rotate 40 right duplicate resize 75 add drop shadow
Open Fan copy paste as new layer resize 39 percent image rotate right 20 add drop shadow
Open Tequila Sunrise copy paste as new layer resize 55 percent add drop shadow
Open lei copy paste as new layer resize 45 percent image rotate right 20 duplicate drag this one under frame go back to top one erase little add drop shadow to bottom one
Open Cocktail copy paste as new layer resize 35 percent add drop shadow
Open tube copy paste as new layer resize 85 percent add drop shadow
Open word art copy paste as new layer add drop shadow
Add your name Font Pea Biggio forground #c03e26 background #e87941 effects inner bevel texture effects weave add gradient glow & add drop shadow
Add your copyright info
resize & save your tag
Love to see your results please email to me so i can put in my show off blog
Thankyou ♥
Written by ©Lyn(akaAngel) 3rd July 2011, any similarity to any other tutorial is purely coincidental!
This is A Result from Dixie this is Awesome Thankyou ♥

♥ Sunrise Summer ♥

To View Tag In Proper Size Click On The Tag
Supplies Needed
Scrapkit by Creative Scraps by Crys called Sunrise Summer this is PTU Here
Tube of choice im using ©Dean Yeagle i brought my license & tube at CILM all hes tubes are at CDO Here
Mask WSL_Mask178 at weescotslass Here
Font of choice or the one im using is Pea Aimee
Lets Get Started
Open new image 650x550
Open paper9 copy paste as new layer apply mask merge group
Open frame5 copy paste as new layer resize 70 percent with magic wand click in frame selection modify expand by 6
Open paper1 copy paste as new layer resize 55 percent invert delete on keyboard select none drag under frame add drop shadow to frame
Open palm tree copy paste as new layer resize 70 percent add drop shadow
Open fence copy paste as new layer resize 75 percent add drop shadow
Open deck chair copy paste as new layer resize 55 percent mirror add drop shadow
Open drink copy paste as new layer resize 35 percent add drop shadow
Open Beach Umberalla copy paste as new layer resize 75 percent add drop shadow
Open starfish copy paste as new layer resize 25 percent add drop shadow
Open starfish3 copy paste as new layer resize 15 percent add drop shadow
Open tube copy paste as new layer add drop shadow
Add your name & the words Sunrise Summer Font Pea Aimee forground #f19d61 background #ea6e8d add gradient glow & add drop shadow
Add your copyright info
resize & save your tag
Love to see your results please email to me so i can put in my show off blog
Thankyou ♥
Written by ©Lyn(akaAngel) 3rd July 2011, any similarity to any other tutorial is purely coincidental!
This is Result from Dixie isnt this awesome Thankyou ♥

♥ American Dream ♥

To View Tag In Proper Size Click On The Tag
Supplies Needed
Scrapkit by Tonie Posers called American Dream this is PTU Here
Tube of choice im using ©Elias Chatzoudis i brought my license & tube at MPT all hes tubes are at PTE Here
Mask WSL_Mask62 at weescotslass Here
Font of choice or the one im using is Midland Rail NF
Lets Get Started
Open new image 650x550
Open tinxscraps_american_dream_paper 28 copy paste as new layer apply mask merge group duplicate merge down
Open tinxscraps_american_dream_frame 8 copy paste as new layer resize 45 percent with magic wand click in frame selection modify expand by 4
Open tinxscraps_american_dream_paper 14 copy paste as new layer invert delete on keyboard select none drag under frame add drop shadow to frame
Open tinxscraps_american_dream_doodle copy paste as new layer drag under frame add drop shadow
Open tinxscraps_american_dream_eagle tilliam art copy paste as new layer resize 45 percent add drop shadow
Open tinxscraps_american_dream_fireworks 4 copy paste as new layer resize 55 percent adjust add remove noise 52 guassian monochrome checked add drop shadow
Open tinxscraps_american_dream_teddy button 1 copy paste as new layer resize 20 percent add drop shadow
Open tube copy paste as new layer add drop shadow
Add your name Font Midland Rail NF forground #282842 background #00009c effects inner bevel texture effects weave add gradient glow & add drop shadow
Add your copyright info
resize & save your tag
Love to see your results please email to me so i can put in my show off blog
Thankyou ♥
Written by ©Lyn(akaAngel) 2nd July 2011, any similarity to any other tutorial is purely coincidental!
♥ Autumn Is Here ♥

To View Tag In Proper Size Click On The Tag
Supplies Needed
Scrapkit by Sweet Cravings Scrap called Yesterdays Gone this is PTU Here
Font of choice or the one im using is Do I like Stripes?
Lets Get Started
Open new image 650x550
Open SCS_YesterdaysGone_Frame5 copy paste as new layer resize 75 percent click in frame with magic wand select all float defloat Open SCS_YesterdaysGone_Grass1 copy paste as new layer invert delete on keyboard dont deselect Open SCS_YesterdaysGone_Paper8 delete on keyboard drag under frame select none add drop shadow to frame
Open SCS_YesterdaysGone_AutumnVine2 copy paste as new layer resize 80 percent adjust add remove noise guassian 52 monochrome checked add drop shadow
Open SCS_YesterdaysGone_Leaves3 copy paste as new layer resize 75 percent mirror adjust add remove noise guassian 52 monochrome checked add drop shadow
Open SCS_YesterdaysGone_Mushroom2 copy paste as new layer resize 55 percent add drop shadow
Open SCS_YesterdaysGone_AutumnDecor2 copy paste as new layer resize 65 percent add drop shadow
Open SCS_YesterdaysGone_Scarecrow copy paste as new layer resize 70 percent add drop shadow
Open medi_carnelia7 copy paste as new layer resize 80 percent add drop shadow
Open SCS_YesterdaysGone_WordArt copy paste as new layer resize 40 percent add gradient glow & add drop shadow
Add your name Font Do I like Stripes? forground #de4900 background #af6820 add drop shadow
Add your copyright info
resize & save your tag
Love to see your results please email to me so i can put in my show off blog
Thankyou ♥
Written by ©Lyn(akaAngel) 1st July 2011, any similarity to any other tutorial is purely coincidental!
♥ Queen Of Hearts ♥

To View Tag In Proper Size Click On The Tag
Supplies Needed
Scrapkit by Tonie Posers called Queen Of Hearts this is PTU Here
Mask WSL_Mask178 at weescotslass Here
Font of choice or the one im using is MrBlaketon
Lets Get Started
Open new image 650x550
Open queen of hearts paper 4 copy paste as new layer apply mask merge
Open queen of hearts doodle 2 copy paste as new layer add drop shadow
Open queen of hearts stone arch copy paste as new layer resize 65 percent add drop shadow
Open queen of hearts mushrooms copy paste as new layer add drop shadow
Open queen of hearts pocket watch copy paste as new layer resize 55 percent adjust add remove noise 52 guassian monochrome checked add drop shadow
Open queen of hearts grass mushrooms copy paste as new layer resize 65 percent add drop shadow
Open queen of hearts garden sign copy paste as new layer resize 65 percent add drop shadow
Open queen of hearts tube copy paste as new layer resize 65 percent add drop shadow
Add your name Font MrBlaketon forground #751116 background #8b2929 add gradient glow & add drop shadow
Add your copyright info
resize & save your tag
Love to see your results please email to me so i can put in my show off blog
Thankyou ♥
Written by ©Lyn(akaAngel) 2nd July 2011, any similarity to any other tutorial is purely coincidental!
♥ Sweet As Chocolate ♥

To View Tag In Proper Size Click On The Tag
Supplies Needed
Scrapkit by Designs by Stina called Chocolate Kisses this is PTU Here
Tube of choice im using ©Elias Chatzoudis i brought my license & tube at MPT all hes tubes are at PTE Here
Mask WSL_Mask78 & 57 at weescotslass Here
Font of choice or the one im using is Buffet Script
Lets Get Started
Open new image 650x550
Open DBS_Paper05 copy paste as new layer apply mask78 merge group
Open DBS_Paper01 copy paste as new layer apply mask57 merge group duplicate merge down adjust add remove noise 86 gaussian monochrome checked
Open DBS_Frame03 copy paste as new layer resize 75 percent with magic wand click in frame selection modify expand by 4
Open DBS_DrippingChocolate copy paste as new layer invert delete on keyboard select none drag under frame add drop shadow to frame & drips
Open DBS_WordArt05 copy paste as new layer resize 85 percent add gradient glow & add drop shadow
Open DBS_Kissy01 copy paste as new layer resize 45 percent add drop shadow
Open DBS_Hearts08 copy paste as new layer resize 85 percent add drop shadow
Open DBS_ChocolateStrawberry01 copy paste as new layer resize 20 percent duplicate mirror arrange on tag add drop shadow
Open DBS_ChocolateBag copy paste as new layer resize 40 percent add drop shadow
Open DBS_ChocolateTini copy paste as new layer drag this under frame add drop shadow
Open tube copy paste as new layer add drop shadow
Add your name Font Buffet Script forground #4f3231 background #593938 effects add gradient glow & add drop shadow
Add your copyright info
resize & save your tag
Love to see your results please email to me so i can put in my show off blog
Thankyou ♥
Written by ©Lyn(akaAngel) 1st July 2011, any similarity to any other tutorial is purely coincidental!
♥ Welcome ♥

To View Tag In Proper Size Click On The Tag
Supplies Needed
Scrapkit by Sweet Cravings Scrap called Feels Like Today this is PTU Here
Mask WSL_Mask192 at weescotslass Here
Font of choice or the one im using is P22Virginian
Lets Get Started
Open new image 650x550
Open SCS_FeelsLikeToday_Paper8 copy paste as new layer resize 75 percent apply mask 192 merge group
Open SCS_FeelsLikeToday_Frame5 copy paste as new layer resize 75 percent add drop shadow
with selection tool go around frame open SCS_FeelsLikeToday_Paper9 copy paste as new layer invert delete on keyboard select none drag under frame
Open SCS_FeelsLikeToday_Tree copy paste as new layer resize 75 percent drag under frame
Open SCS_FeelsLikeToday_LadybugScatter copy paste as new layer resize 45 percent mirror add drop shadow
Open SCS_FeelsLikeToday_Flower2 copy paste as new layer resize 45 percent duplicate image rotate 20 left add drop shadow
Open SCS_FeelsLikeToday_Fence1 copy paste as new layer resize 65 percent drag under frame erase overlapping add drop shadow
Open SCS_FeelsLikeToday_FantasyHouse copy paste as new layer resize 65 percent add drop shadow
Open SCS_FeelsLikeToday_Owl1 copy paste as new layer resize 25 percent add drop shadow
Open SCS_FeelsLikeToday_Ladybug4 copy paste as new layer resize 35 percent add drop shadow
Open medi_lilbug4 copy paste as new layer resize 65 percent add drop shadow
Add your name Font P22Virginian forground #000000 background #8c0201 add drop shadow
Add your copyright info
resize & save your tag
Love to see your results please email to me so i can put in my show off blog
Thankyou ♥
Written by ©Lyn(akaAngel) 1st July 2011, any similarity to any other tutorial is purely coincidental!
♥ Pretty As A Picture ♥

To View Tag In Proper Size Click On The Tag
Supplies Needed
Scrapkit by Busy Scrappin called SpringSational this is PTU Here
Tube of choice im using ©Half Pints at MPT Here
Mask WSL_Mask178 at weescotslass Here
Font of choice or the one im using is dearJoe four
Lets Get Started
Open new image 650x550
Open MattPurple copy paste as new layer resize 15 percent move this to right slightly duplilcate mirror bring both together with pick tool bring out on right side slightly add drop shadow
Open SpringSationalBG18 copy paste as new layer resize 65 percent apply mask 178 merge group
Open FlowerdLacesPink copy paste as new layer resize 35 percent add drop shadow
Open RibbonsBows04 copy paste as new layer resize 35 percent add drop shadow
Open BloomedVinery copy paste as new layer resize 35 percent add drop shadow
Open PoloroidFloralCluster copy paste as new layer resize 20 percent click in frames with magic wand open SpringSationalBG04 copy paste as new layer resize 35 percent selection invert delete on keyboard drag under frame keep selected open your tube copy into frame & delete select none Blend mode Luminance (L) add drop shadow to tube & frame
re Paste your tube add drop shadow
Add your name & the words Pretty as a Picture Font dearJoe four forground #964880 background #8562b5 add gradient glow & add drop shadow
Add your copyright info
resize & save your tag
Love to see your results please email to me so i can put in my show off blog
Thankyou ♥
Written by ©Lyn(akaAngel) 1st July 2011, any similarity to any other tutorial is purely coincidental!
♥ My Happy Ending ♥

To View Tag In Proper Size Click On The Tag
Supplies Needed
Scrapkit by Sweet Cravings Scrap called My Happy Ending this is PTU Here
Font of choice or the one im using is Mr Lackboughs
Lets Get Started
Open new image 650x550
Open SCS_MyHappyEnding_Flower5 copy paste as new layer duplicate image flip mirror add drop shadow
Open SCS_MyHappyEnding_Frame4 copy paste as new layer resize 75 percent click in frame with magic wand select all float defloat Open SCS_MyHappyEnding_Paper4 copy paste as new layer invert delete on keyboard dont deselect Open SCS_MyHappyEnding_Castle delete on keyboard drag under frame select none add drop shadow to frame & castle
Open SCS_MyHappyEnding_Carriage copy paste as new layer resize 55 percent mirror add drop shadow
Open SCS_MyHappyEnding_Flower1 copy paste as new layer resize 65 percent add drop shadow
Open SCS_MyHappyEnding_FlowingHearts3 copy paste as new layer duplicate image flip merge down add drop shadow
Open SCS_MyHappyEnding_GoldHeal copy paste as new layer resize add drop shadow
Open medi_cartiere5 copy paste as new layer resize 45 percent add drop shadow
Open medi_evangeline1 copy paste as new layer resize 55 percent add drop shadow
Open SCS_MyHappyEnding_StackedHearts2 copy paste as new layer resize 35 percent add drop shadow
Add your name Font Mr Lackboughs forground #774561 background #ffffff add drop shadow
Add your copyright info
resize & save your tag
Love to see your results please email to me so i can put in my show off blog
Thankyou ♥
Written by ©Lyn(akaAngel) 1st July 2011, any similarity to any other tutorial is purely coincidental!
Subscribe to:
Posts (Atom)


