♥ Welcome ♥

♥ My Blinkie ♥

2014

To View Tag In Proper Size Click On The Tag
Supplies Needed
PTU Scrapkit New Year By Vickie
Tube of choice im using Jamie Kidd this is a PTU Tube
Mask WSL_Mask84 at weescotslass
Font of choice or the one im using is AL Sandra
Lets Get Started
Open new image 650X550
Open NY_pp20_VS copy paste as new layer apply mask 84 merge group
Open NY_el52_VS copy paste as new layer resize 75 percent click in frames with magic wand modify expand by 5
Open NY_pp9_VS copy paste as new layer invert delete on keyboard drag paper under frame keep selected
Open NY_el4_VS copy paste each one delete on keyboard select none drag under frame
Open NY_el62_VS copy paste as new layer resize 60 percent add drop shadow
Open NY_el54_VS copy paste as new layer resize 35 percent add drop shadow
Open NY_el46_VS copy paste as new layer resize 55 percent add drop shadow
Open NY_el80_VS copy paste as new layer add drop shadow
Open NY_el44_VS copy paste as new layer resize 45 percent add drop shadow
Open NY_el5_VS copy paste as new layer image mirror drag under frame duplicate flip mirror
Open tube copy paste as new layer duplicate drag under frame erase on both tubes add drop shadow to bottom tube
Add your name Font AL Sandra forground #ffe98a background #000000 add drop shadow
Add your copyright info
resize & save your tag
If you like this Tut check the boxes below Love to see your results please email to me
Thankyou ♥
Written by ©Lyn(akaAngel) 31st December 2013, any similarity to any other tutorial is purely coincidental!

♥ Merry Christmas ♥

To View Tag In Proper Size Click On The Tag
Supplies Needed
This is my last christmas tut for 2013 i want to wish everyone a
Very Merry Christmas ♥
Very Merry Christmas ♥
FTU Scrapkit Jingle Bells By dzines by melz
Tube of choice im using Keith Garvey This is a PTU Tube
Mask WSL_Mask84 at weescotslass
Font of choice or the one im using is Aquarelle
Lets Get Started
Open new image 750x700
Open Paper2 copy paste as new layer apply mask merge group
Open candy frame1 copy paste as new layer with magic wand click in frame selection modify expand by 4
Open Paper8 copy paste as new layer selection invert delete on keyboard keep selected
Open tube copy paste as new layer delete on keyboard lower opacity 36
Copy main tube as new layer add drop shadow
Open Sparkle2 copy paste as new layer drag this under frame
Open candle decor 4 copy paste as new layer resize 80 percent add drop shadow
Open tree copy paste as new layer resize add drop shadow
Open gift copy paste as new layer resize 45 percent duplicate resize this one at 65 percent add drop shadow
Open teddy copy paste as new layer resize 45 percent add drop shadow
Open ornament2 copy paste as new layer resize 65 percent add drop shadow
Open Banner copy paste as new layer resize 65 percent adjust sharpen add drop shadow
Add your name Font Aquarelle forground #000000 background #ed142d add gradient glow & add drop shadow
Add your copyright info
resize & save your tag
If you like this Tut check the boxes below Love to see your results please email to me
Thankyou ♥
Written by ©Lyn(akaAngel) 21st December 2013, any similarity to any other tutorial is purely coincidental!
♥ Tropical Tequila ♥

To View Tag In Proper Size Click On The Tag
Supplies Needed
FTU Scrapkit Tequila By kittzkreationz
Tube of choice im using Jamie Kidd this is a PTU Tube
Font of choice or the one im using is Snickles
Lets Get Started
Open new image 750x700
Open T-34 copy paste as new layer resize 80 percent duplicate dlip mirror merge down duplicate
Open T-11 copy paste as new layer resize 85 percent with magic wand click in frame selection modify expand by 11
Open T-P3 copy paste as new layer selection invert delete on keyboard select none drag paper under frame give frame a drop shadow
Open T-54 copy paste as new layer add drop shadow
Open T-40 copy paste as new layer add drop shadow
Open T46A copy paste as new layer add drop shadow
Open T46 copy paste as new layer resize 65 percent add drop shadow
Open T-45 copy paste as new layer add drop shadow
Open T-44 copy paste as new layer resize 55 percent image rotate 20 percent right add drop shadow
Open tube copy paste as new layer mirror drag this under frame duplicate send this one to top erase slightly go back to bottom tube add drop shadow
Add your name & the words Tropical Tequila Font Snickles forground #fffd47 background #ff6640 add drop shadow
Add your copyright info
resize & save your tag
If you like this Tut check the boxes below Love to see your results please email to me
Thankyou ♥
Written by ©Lyn(akaAngel) 22nd December 2013, any similarity to any other tutorial is purely coincidental!
♥ Elegant ♥

To View Tag In Proper Size Click On The Tag
Supplies Needed
PTU Scrapkit Elegant By Vickie
Tube of choice im using Jamie Kidd this is a PTU Tube
Mask WSL_Mask84 at weescotslass
Font of choice or the one im using is Verticalization
Lets Get Started
Open new image 750x700
Open Elegant_Paper11_Vs copy paste as new layer apply mask merge group
Open Elegant_Frame3_VS copy paste as new layer resize 85 percent with magic wand click in frame selection modify expand by 4
Open Elegant_Paper6_VS copy paste as new layer selection invert delete on keyboard keep selected
Open tube copy paste as new layer duplicate put this one above frame go back to bottom tube erase then go back to top tube erase some more go back to bottom tube add a drop shadow
Open Elegant_PlantLeaf2_VS copy paste as new layer resize 50 percent this should be under bottom tube add drop shadow
Open Elegant_FLower12_VS copy paste as new layer resize 60 percent add drop shadow
Open Elegant_Bottles2_VS copy paste as new layer resize 45 percent add drop shadow
Open Elegant_Flowerspray copy paste as new layer resize 65 percent add drop shadow
Open Elegant_HeartBalloons_VS copy paste as new layer resize 65 percent add drop shadow
Open Elegant_Butterfly5_VS copy paste as new layer resize 40 percent add drop shadow
Add your name Font Verticalization forground #518fb4 background #ffffff add drop shadow
Add your copyright info
resize & save your tag
If you like this Tut check the boxes below Love to see your results please email to me
Thankyou ♥
Written by ©Lyn(akaAngel) 21st December 2013, any similarity to any other tutorial is purely coincidental!
♥ Merry Christmas ♥

To View Tag In Proper Size Click On The Tag
Supplies Needed
FTU Scrapkit called Frosty Snowman
Template 31 by scrapznstuff
Tube of choice im using Keith Garvey This is a PTU Tube
Font of choice or the one im using is CapriceBQ
Lets Get Started
Open template duplicate close original on the duplicate resize 600 x 600 pixels delete Tou layer
Go to foto left selection select all float defloat Open DmsMDFrostyTheSnowmanPaper07 copy paste as new layer invert delete on keyboard keep selected Open Tube copy paste as new layer delete on keyboard select none add drop shadow to tube
Go to frame left's Drop Shadow add drop shadow
Go to frame left selection select all float defloat Open DmsMDFrostyTheSnowmanPaper05 copy paste as new layer invert delete on keyboard select none add drop shadow
Go to foto middle selection select all float defloat Open DmsMDFrostyTheSnowmanPaper07 copy paste as new layer invert delete on keyboard keep selected Open Tube copy paste as new layer delete on keyboard select none add drop shadow to tube
Go to frame middle Drop Shadow add drop shadow
Go to frame middle selection select all float defloat Open DmsMDFrostyTheSnowmanPaper05 copy paste as new layer invert delete on keyboard select none add drop shadow
Go to foto right selection select all float defloat Open DmsMDFrostyTheSnowmanPaper07 copy paste as new layer invert delete on keyboard keep selected Open Tube copy paste as new layer delete on keyboard select none add drop shadow to tube
Go to frame middle Drop Shadow add drop shadow
Go to frame middle selection select all float defloat Open DmsMDFrostyTheSnowmanPaper05 copy paste as new layer invert delete on keyboard select none add drop shadow
Go to cloth line's Drop Shadow add drop shadow
Go to cloth line selection select all float defloat Open DmsMDFrostyTheSnowmanPaper08 copy paste as new layer invert delete on keyboard select none add drop shadow
Go to cloth-pin right's Drop Shadow add drop shadow
Go to cloth-pin right selection select all float defloat Open DmsMDFrostyTheSnowmanPaper01 copy paste as new layer invert delete on keyboard select none add drop shadow
Go to cloth-pin middle's Drop Shadow add drop shadow
Go to cloth-pin right selection select all float defloat Open DmsMDFrostyTheSnowmanPaper01 copy paste as new layer invert delete on keyboard select none add drop shadow
Go to cloth-pin left's Drop Shadow add drop shadow
Go to cloth-pin left selection select all float defloat Open DmsMDFrostyTheSnowmanPaper01 copy paste as new layer invert delete on keyboard select none add drop shadow
Go to santa´s slay selection select all float defloat Open DmsMDFrostyTheSnowmanPaper02 copy paste as new layer invert delete on keyboard select none add drop shadow
Go to landscape's Drop Shadow add drop shadow
Go to Trees add drop shadow
Go to Christmas's Drop Shadow add drop shadow
Go to Christmas selection select all float defloat Open DmsMDFrostyTheSnowmanPaper04 copy paste as new layer invert delete on keyboard select none add drop shadow
Go to merry's Drop Shadow add drop shadow
Go to Merry selection select all float defloat Open DmsMDFrostyTheSnowmanPaper04 copy paste as new layer invert delete on keyboard select none add drop shadow
Open DmsMDFrostyTheSnowmanSnowman02 copy paste as new layer drag this under the word art resize 65 percent add drop shadow
Open DmsMDFrostyTheSnowmanSnowman01 copy paste as new layer drag this under the word art resize 40 percent add drop shadow
resize all layers 80 percent merge all visible
apply filters unlimited with this setting

Add your name Font CapriceBQ forground #cbc6c6 background #cbc6c6 add gradient glow & add drop shadow
Add your copyright info
resize & save your tag
If you like this Tut check the boxes below Love to see your results please email to me
Thankyou ♥
Written by ©Lyn(akaAngel) 14th December 2013, any similarity to any other tutorial is purely coincidental!
this is awesome result from Dixie Thankyou ♥

this is awesome result from Dixie Thankyou ♥

♥ Cowgirls Ride ♥

To View Tag In Proper Size Click On The Tag
Supplies Needed
FTU Scrapkit By Sweet Cravings Scrap called Happy Trails
Template_01 By simply4u this is FTU
Tube of choice im using Elias Chatzoudis this is a PTU Tube
Mask WSL_Mask10 at weescotslass
Filters Unlimited
Font of choice or the one im using is WesternSlant
Lets Get Started
Open Template duplicate close Original template Delete Tou Layer
Go to background layer new raster layer select all open SCS_JRBT_HappyTrails_Paper4 copy paste into selection select none apply mask merge group duplicate merge down
Go to Large Circle select all float defloat Open SCS_JRBT_HappyTrails_Paper2 copy paste as new layer invert delete on keyboard select none add drop shadow
Go to Small Circle select all float defloat Open SCS_JRBT_HappyTrails_Paper8 copy paste as new layer invert delete on keyboard
keep selected Open SCS_JRBT_HappyTrails_DesertOverlook delete on keyboard select none add drop shadow
Go to Rectangle select all float defloat Open SCS_JRBT_HappyTrails_Paper9 copy paste as new layer invert delete on keyboard select none add gradient glow #ffffff add drop shadow
Go to Stars select all float defloat Open SCS_JRBT_HappyTrails_Paper5 copy paste as new layer invert delete on keyboard select none add drop shadow
Go to Wordart select all float defloat Open SCS_JRBT_HappyTrails_Paper2 copy paste as new layer invert delete on keyboard select none add gradient glow #ffffff add drop shadow
Open SCS_JRBT_HappyTrails_DriedGrass copy paste as new layer drag this under the stars layer
Open SCS_JRBT_HappyTrails_Fence copy paste as new layer resize 75 percent drag this under rectangle layer add drop shadow
Open SCS_JRBT_HappyTrails_Horseshoe1 copy paste as new layer resize 35 percent add drop shadow
Open tube copy paste as new layer move this above dotted circle layer add drop shadow
Go to white background layer add new raster layer select all Open SCS_JRBT_HappyTrails_Paper2 copy paste into selection select none effects filter unlimited
with this setting

Add your name Font WesternSlant forground #4f4e6d background #daa370 add drop shadow
Add your copyright info
delete white background layer & resize & save your tag
If you like this Tut check the boxes below Love to see your results please email to me
Thankyou ♥
Written by ©Lyn(akaAngel) 14th December 2013, any similarity to any other tutorial is purely coincidental!
♥ I'll Be Home For Christmas ♥

To View Tag In Proper Size Click On The Tag
Supplies Needed
Scrapkit Home for the Holidays by Sweet Cravings Scrap this is PTU
Tube of choice im using Keith Garvey This is a PTU Tube
Mask WSL_Mask84 at weescotslass
Font of choice or the one im using is Birmingham-Caps,Carpenter Script
Lets Get Started
Open new image 650X550
Open SCS_HomeForTheHolidays_Paper7 copy paste as new layer apply mask merge group duplicate merge down
Open SCS_HomeForTheHolidays_Frame6 copy paste as new layer resize 65 percent click in frame with magic wand modify expand by 4
Open SCS_HomeForTheHolidays_Paper2 copy paste as new layer selection invert delete on keyboard select none drag under frame add drop shadow to frame
Open SCS_HomeForTheHolidays_GlitterBranch2 copy paste as new layer lower opacity to 42 add drop shadow
Open SCS_HomeForTheHolidays_TreeDecorated copy paste as new layer resize 20 percent add drop shadow
Open SCS_HomeForTheHolidays_Snowman copy paste as new layer resize 40 percent add drop shadow
Open SCS_HomeForTheHolidays_Holly copy paste as new layer resize 35 percent add drop shadow
Go back to frame click in frame with magic wand modify expand by 4 Open SCS_HomeForTheHolidays_Snow copy paste as new layer selection invert delete on keyboard select none drag under frame
Open SCS_HomeForTheHolidays_PineCone copy paste as new layer resize 25 percent then resize 45 percent add drop shadow duplicate 2 times arrange on tag
Open SCS_HomeForTheHolidays_Decoration copy paste as new layer resize 35 percent add drop shadow
Open Tube copy paste as new layer add drop shadow
Add words I'll Be Home Font Birmingham-Caps forground #900d0d background #ff81a7 add drop shadow
Add words For Christmas Font Carpenter Script forground #900d0d background #ff81a7 add drop shadow add gradient glow #ffffff
Add your name Font Carpenter Script forground #900d0d background #ff81a7 add gradient glow & add drop shadow
Add your copyright info
resize & save your tag
If you like this Tut check the boxes below Love to see your results please email to me
Thankyou ♥
Written by ©Lyn(akaAngel) 13 December 2013, any similarity to any other tutorial is purely coincidental!
♥ Working For A Living ♥

To View Tag In Proper Size Click On The Tag
Supplies Needed
Scrapkit Working for a living by Sweet Cravings Scrap this is PTU
Mask WSL_Mask84 at weescotslass
Font of choice or the one im using is Chancera
Lets Get Started
Open new image 650X550
Open SCS_WorkingForALiving_Paper12 copy paste as new layer apply mask merge group duplicate merge down
Open SCS_WorkingForALiving_Frame6 copy paste as new layer resize 65 percent click in frame with magic wand modify expand by 4
Open SCS_WorkingForALiving_Road copy paste as new layer selection invert delete on keyboard keep selected
open SCS_WorkingForALiving_Paper7 copy paste as new layer delete on keyboard select none drag under frame add drop shadow to frame
Open SCS_WorkingForALiving_Leavescopy paste as new layer lower opacity to 55 duplicate mirror resize 50 percent duplicate this one mirror add drop shadow
Open SCS_WorkingForALiving_Bee copy paste as new layer resize 35 percent add drop shadow
Open SCS_WorkingForALiving_DrumpTruck copy paste as new layer resize 35 percent add drop shadow
Open SCS_WorkingForALiving_TrafficLight copy paste as new layer resize 45 percent add drop shadow
Open SCS_WorkingForALiving_Flower10 copy paste as new layer resize 50 percent add drop shadow
Open SCS_WorkingForALiving_Screwdriver copy paste as new layer resize 35 percent add drop shadow
Open SCS_WorkingForALiving_Hammer copy paste as new layer resize 30 percent add drop shadow
Open sk-worker002 copy paste as new layer resize 75 percent add drop shadow
Open SCS_WorkingForALiving_RoadSign1 copy paste as new layer resize 20 percent add drop shadow
Add your name Font Chancera forground #000000 background #fff646 add drop shadow
Add your copyright info
resize & save your tag
If you like this Tut check the boxes below Love to see your results please email to me
Thankyou ♥
Written by ©Lyn(akaAngel) 13 December 2013, any similarity to any other tutorial is purely coincidental!
♥ Itsy Bitsy Spider ♥

To View Tag In Proper Size Click On The Tag
Supplies Needed
Scrapkit Itsy Bitsy Spider by Sweet Cravings Scrap this is PTU
Tube of choice im using CEI Stickers(Girlfriends)
I brought mine through MPT Sorry im not sure where they have gone since MPT closed down
Mask WSL_Mask38 at weescotslass
Font of choice or the one im using is BickhamScriptFancy2
Lets Get Started
Open new image 650X550
Open SCS_ItsyBitsySpider_Paper13 copy paste as new layer apply mask merge group duplicate merge down
Open SCS_ItsyBitsySpider_Frame6 copy paste as new layer resize 45 percent mirror click in frame with magic wand modify expand by 4
Open SCS_ItsyBitsySpider_Paper2 copy paste as new layer selection invert delete on keyboard Keep selected
Open SCS_ItsyBitsySpider_Fence copy paste as new layer select none add drop shadow to frame & fence
Open SCS_ItsyBitsySpider_Bird2 copy paste as new layer resize 20 percent mirror add drop shadow
Open SCS_ItsyBitsySpider_Tree copy paste as new layer resize 65 percent add drop shadow
Open SCS_ItsyBitsySpider_Logs copy paste as new layer resize 40 percent add drop shadow
Open SCS_ItsyBitsySpider_BucketOfApples copy paste as new layer resize 40 percent add drop shadow
Open SCS_ItsyBitsySpider_Stool copy paste as new layer resize 25 percent add drop shadow
Open SCS_ItsyBitsySpider_Spider1 copy paste as new layer resize 35 percent mirror add drop shadow
Open SCS_ItsyBitsySpider_Apple2 copy paste as new layer resize 20 percent add drop shadow
Open SCS_ItsyBitsySpider_Apple1 copy paste as new layer resize 25 percent add drop shadow
Open SCS_ItsyBitsySpider_Basket copy paste as new layer resize 20 percent add drop shadow
Open Tube copy paste as new layer add drop shadow
Add your name Font BickhamScriptFancy2 forground #f1f000 background #ec7588 add drop shadow
Add your copyright info
resize & save your tag
If you like this Tut check the boxes below Love to see your results please email to me
Thankyou ♥
Written by ©Lyn(akaAngel) 13 December 2013, any similarity to any other tutorial is purely coincidental!
♥ Looking Through ♥
FTU Scrapkit Scrap #40 By Becky
Template 05 By Becky
Mask WSL_Mask84 at weescotslass
Font of choice or the one im using is Filigree
Lets Get Started
Open template duplicate close the original
Delete layers white background & credits
on the template canvas size 650x650
Go to left frame fill selections select all float defloat open paper4 copy paste as new layer invert delete on keyboard keep selected
Open Tube copy paste as new layer delete on keyboard select none add drop shadow to frame
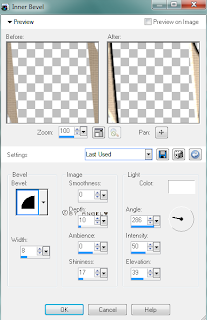
Go to left frame selections select all float defloat open paper7 invert select none add innerbevel with this setting

Go to right frame fill selections select all float defloat open paper4 copy paste as new layer invert delete on keyboard keep selected
Open Tube copy paste as new layer delete on keyboard select none add drop shadow to frame
Go to right frame selections select all float defloat open paper7 invert select none add innerbevel with same setting as before
Go to gray heart1 selections select all float defloat open paper6 copy paste as new layer invert delete on keyboard select none add drop shadow
Go to gray heart2 selections select all float defloat open paper6 copy paste as new layer invert delete on keyboard select none add drop shadow
Go to gray heart3 selections select all float defloat open paper6 copy paste as new layer invert delete on keyboard select none add drop shadow
Go to sm. gray heart1 selections select all float defloat open paper6 copy paste as new layer invert delete on keyboard select none add drop shadow
Go to sm. gray heart2 selections select all float defloat open paper6 copy paste as new layer invert delete on keyboard select none add drop shadow
Go to sm. gray heart1 selections select all float defloat open paper6 copy paste as new layer invert delete on keyboard select none add drop shadow
Go to tiny gray heart1 selections select all float defloat open paper6 copy paste as new layer invert delete on keyboard select none add drop shadow
Go to tiny gray heart2 selections select all float defloat open paper6 copy paste as new layer invert delete on keyboard select none add drop shadow
Go to tiny gray heart3 selections select all float defloat open paper6 copy paste as new layer invert delete on keyboard select none add drop shadow
Go to lg. white heart1 selections select all float defloat open paper1 copy paste as new layer invert delete on keyboard select none add drop shadow
Go to lg. white heart2 selections select all float defloat open paper1 copy paste as new layer invert delete on keyboard select none add drop shadow
Go to lg. white heart3 selections select all float defloat open paper1 copy paste as new layer invert delete on keyboard select none add drop shadow
Go to tiny white heart1 selections select all float defloat open paper5 copy paste as new layer invert delete on keyboard select none add drop shadow
Go to tiny white heart2 selections select all float defloat open paper5 copy paste as new layer invert delete on keyboard select none add drop shadow
Go to black heart selections select all float defloat open paper5 copy paste as new layer invert delete on keyboard select none add drop shadow
Open jewlery cases resize 80 percent add drop shadow
open butterfly with pick tool hold shift key down move the butterfly down a bit add drop shadow duplicate mirror
new raster layer select all Open paper3 copy paste into selection select none apply mask merge group arrange send to bottom
Open curslyswirl1 copy paste as new layer image rotate 90 percent drag to above mask layer move over duplicate mirror flip merge down on top one add drop shadow
Add your name Font Filigree forground #b1c6cb background #574e45 add gradient glow #3f2c2a add drop shadow
Add your copyright info
resize & save your tag
If you like this Tut check the boxes below Love to see your results please email to me
Thankyou ♥
Written by ©Lyn(akaAngel) 12th December 2013, any similarity to any other tutorial is purely coincidental!
♥ Just Beachy ♥

To View Tag In Proper Size Click On The Tag
Supplies Needed
FTU Scrapkit Just Beachy By Pink's Poetic Scraps
FTU Template 32 By Becky
Mask WSL_Mask84 at weescotslass
Font of choice or the one im using is OldGlory
Lets Get Started
Open all papers from the kit duplicate each one & resize 650X600 pixels
Open template duplicate close the original
Delete layers white background & credits
on the template canvas size 650x650
Go to bottom rectangle selections select all float defloat bring up paper JB_P5 copy paste as new layer invert delete on keyboard select none add gradient glow add drop shadow
Go to middle rectangle selections select all float defloat bring up paper JB_P4 copy paste as new layer invert delete on keyboard select none add gradient glow add drop shadow
Go to middle rectangle selections select all float defloat bring up paper JB_P7 copy paste as new layer invert delete on keyboard select none add gradient glow add drop shadow
Go to frame bg selections select all float defloat bring up paper JB_P10 copy paste as new layer invert delete on keyboard select none add gradient glow add drop shadow
Go to frame fill selections select all float defloat bring up paper JB_P8 copy paste as new layer invert delete on keyboard select none add gradient glow add drop shadow
Go to frames selections select all float defloat bring up paper JB_P9 copy paste as new layer invert delete on keyboard select none add gradient glow add drop shadow
Go to bottom blocks selections select all float defloat bring up paper JB_P3 copy paste as new layer invert delete on keyboard select none add gradient glow add drop shadow
Go to top blocks selections select all float defloat bring up paper JB_P6 copy paste as new layer invert delete on keyboard select none
Open PPS_JB6 resize 30 percent add drop shadow
Open PPS_JB18 copy paste as new layer resize 25 percent then resize again at 80 percent add drop shadow
Open PPS_JB1 copy paste as new layer resize 20 percent then resize 50 percent add drop shadow
Open PPS_JB19 copy paste as new layer resize 30 percent then resize 65 percent add drop shadow
Open PPS_JB4 copy paste as new layer resize 20 percent then resize 40 percent add drop shadow
Open PPS_JB7 copy paste as new layer resize 30 percent then again 45 percent add drop shadow
Open PPS_JB7 copy paste as new layer resize 20 percent then resize 40 percent add drop shadow
Open PPS_JB9 copy paste as new layer mirror resize 20 percent then resize 40 percent add drop shadow
Open PPS_JB14 copy paste as new layer resize 20 percent then resize 40 percent add drop shadow
new raster layer select all Open JB_P1 copy paste into selection select none apply mask merge group arrange send to bottom
Add your name Font OldGlory forground #8bd5d8 background #ffffff add drop shadow
Add your copyright info
resize & save your tag
If you like this Tut check the boxes below Love to see your results please email to me
Thankyou ♥
Written by ©Lyn(akaAngel) 12th December 2013, any similarity to any other tutorial is purely coincidental!
♥ Dancing to the Beat ♥

To View Tag In Proper Size Click On The Tag
Supplies Needed
FTU Scrapkit A Girls Winter By Sweet Cravings Scrap
Music Word Art
Mask WSL_Mask38 at weescotslass
Font of choice or the one im using is Before the Rain
Lets Get Started
Open new image 650X550
Open SCS_SYHO_AGirlsWinter_Paper6 copy paste as new layer apply mask duplicate
Open SCS_SYHO_AGirlsWinter_Frame2 copy paste as new layer resize 70 percent click in middle of frame with magic wand modify expand by 2
Open SCS_SYHO_AGirlsWinter_Paper6 copy paste as new layer selection invert delete on keyboard seletion none drag paper under frame add drop shadow to frame
Open SCS_SYHO_AGirlsWinter_Glitter copy paste as new layer resize 75 percent add drop shadow
Open SCS_SYHO_AGirlsWinter_Stars copy paste as new layer resize 65 percent add drop shadow
Open SCS_SYHO_AGirlsWinter_FrozenPond copy paste as new layer resize 65 percent add drop shadow
Open SCS_SYHO_AGirlsWinter_Snowman copy paste as new layer resize 70 percent add drop shadow
Open SCS_SYHO_AGirlsWinter_Penguin copy paste as new layer resize 30 percent add drop shadow
Open SCS_SYHO_AGirlsWinter_Flower2 copy paste as new layer resize 65 percent add drop shadow
Open SCS_SYHO_AGirlsWinter_IceSkatingGirl copy paste as new layer resize 65 percent add drop shadow
Open SCS_SYHO_AGirlsWinter_MusicNote1 copy paste as new layer resize add drop shadow
Open SCS_SYHO_AGirlsWinter_MusicNote2 copy paste as new layer resize add drop shadow
Open Word Art select all float defloat Open SCS_SYHO_AGirlsWinter_Paper4 selection invert delete on keyboard select none go back to the original layer add gradient glow & add drop shadow
Add your name Font Before the Rain forground #ffffff background #ffffff select all float defloat Open SCS_SYHO_AGirlsWinter_Paper4 selection invert delete on keyboard select none go back to the original layer add gradient glow & add drop shadow
Add your copyright info
resize & save your tag
If you like this Tut check the boxes below Love to see your results please email to me
Thankyou ♥
Written by ©Lyn(akaAngel) 12th December 2013, any similarity to any other tutorial is purely coincidental!
♥ Me Naughty Never ♥

To View Tag In Proper Size Click On The Tag
Supplies Needed
FTU Scrapkit Silver By Scrappy Bit Of Fun
Word Art
Tube of choice im using Keith Garvey This is a PTU Tube
Font of choice or the one im using is Filigree
Lets Get Started
Open new image 650X550
Open LH_Silver_Scatter-004 copy paste as new layer duplicate flip mirror
Open LH_Silver_Element-003 copy paste as new layer resize 60 percent mirror add drop shadow
Open LH_Silver_Frame-011 copy paste as new layer resize 75 percent click in frame with magic wand modify expand by 7
Open LH_Silver_Paper-005 copy paste as new layer selection invert delete on keyboard select none add drop shadow to frame
Open LH_Silver_Frame-006 copy paste as new layer resize 70 percent mirror image rotate 20 percent right drag this under last frame click in frame with magic wand modify expand by 7
Open LH_Silver_Paper-005 copy paste as new layer selection invert delete on keyboard select none add drop shadow to frame
Open LH_Silver_Element-017 copy paste as new layer resize 80 percent add drop shadow
Open LH_Silver_Element-003 copy paste as new layer resize 60 percent mirror add drop shadow
Open LH_Silver_Element-016 copy paste as new layer sharpen add drop shadow
Open LH_Silver_Element-019 copy paste as new layer resize 55 percent add drop shadow
Open the wordArt you will find this in Jascie folder copy paste as new layer add drop shadow
Open tube copy paste as new layer add drop shadow
Add your name Font Filigree forground #000000 background #000000 add gradient glow #ffffff add drop shadow
Add your copyright info
resize & save your tag
If you like this Tut check the boxes below Love to see your results please email to me
Thankyou ♥
Written by ©Lyn(akaAngel) 10th December 2013, any similarity to any other tutorial is purely coincidental!
♥ Christmas Magic ♥

To View Tag In Proper Size Click On The Tag
Supplies Needed
Scrapkit Magical Times by scrappy bit of fun this is FTU
word art FTU from scrappy bit of fun this is FTU
Tube of choice im using Elias Chatzoudis this is a PTU Tube
Mask WSL_Mask84 at weescotslass
Font of choice or the one im using is MrBlaketon
Lets Get Started
Open new image 650x550
Open MagicalTimes-LgP3 copy paste as new layer apply mask merge group duplicate merge down
Open Simone_MagicalTimes_element0018 copy paste as new layer add drop shadow
Open Simone_MagicalTimes_element0043 copy paste as new layer drag under frame
Open Simone_MagicalTimes_element0044 copy paste as new layer
Open Simone_MagicalTimes_element0006 copy paste as new layer go to frame click in frame with magic wand selection modify expand by 5 invert delete on keyboard select none drag under frame
Open Simone_MagicalTimes_element0009 copy paste as new layer add drop shadow
Open Simone_MagicalTimes_element0010 copy paste as new layer add drop shadow
Open Simone_MagicalTimes_element0019 copy paste as new layer resize 45 percent add drop shadow
Open Simone_MagicalTimes_element0007 copy paste as new layer resize 55 percent add drop shadow
Open SSLH-Joy2TheWorld-tube copy paste as new layer select all float defloat
Open MagicalTimes-LgP1 copy paste as new layer invert delete on keyboard select none add gradient glow & add drop shadow
Open your tube copy paste as new layer add drop shadow
Add your name Font MrBlaketon forground #ffffff background #ffffff select all float defloat Open MagicalTimes-LgP1 copy paste invert delete on keyboard select none add gradient glow & add drop shadow
Add your copyright info
resize & save your tag
If you like this Tut check the boxes below Love to see your results please email to me
Thankyou ♥
Written by ©Lyn(akaAngel) 10th December 2013, any similarity to any other tutorial is purely coincidental!
♥ Ice Skater ♥

To View Tag In Proper Size Click On The Tag
Supplies Needed
Scrapkit by Amy & Leah called Skater this is FTU
Tube of choice im using Pinuptoons this is a PTU Tube
Mask WSL_Mask38 at weescotslass
Font of choice or the one im using is Carpenter Script
Lets Get Started
Open new image 750X700
Open paper1 copy paste as new layer apply mask merge group duplicate merge down
Open Frame1 copy paste as new layer click in frame with magic wand modify expand by 7
Open Paper7 copy paste as new layer invert delete on keyboard drag under frame Open Swirl copy paste as new layer select none give frame & swirl a drop shadow
Open Flowers copy paste as new layer duplicate resize 80 percent move thisover a little add drop shadow
Open ice copy paste as new layer
Open snowflake2 copy paste as new layer resize 55 percent add drop shadow duplicate 2 times arrange on tag
Open Snowman copy paste as new layer resize 60 percent add drop shadow
Open Snow copy paste as new layer
Open WA copy paste as new layer sharpen
Open tube copy paste as new layer add drop shadow
Add the word Skater font Carpenter Script forground #ededed background #f8f8f8 add dropshadow
Add your name Font Carpenter Script forground #99beca background #ffffff add dropshadow
Add your copyright info
resize & save your tag
If you like this Tut check the boxes below Love to see your results please email to me
Thankyou ♥
Written by ©Lyn(akaAngel) 8th December 2013, any similarity to any other tutorial is purely coincidental!
this is awesome result from Dixie Thankyou ♥

this is awesome result from Dixie Thankyou ♥

♥ Country Kitchen ♥

To View Tag In Proper Size Click On The Tag
Supplies Needed
FTU Scrapkit Country Kitchen by Amy & Leah
Tube of choice im using Andy Screen/Anjara This is a PTU
You require a license to use This tube which I purchased from PSP Tubes Emporium
Im sorry not sure where to buy Andy's Tubeanymore if someone knows & can let me know would be great Thankyou
Mask WSL_Mask84 at weescotslass
Font of choice or the one im using is Aquarelle
Lets Get Started
Open new image 750x700
Open paper1 copy paste as new layer apply mask merge group duplicate mirror flip
Open frame4 copy paste as new layer resize 45 percent click in frame with magic wand modify expand by 4
Open paper10 invert delete on keyboard select none drag under frame give frame a drop shadow
Open Bow copy paste as new layer add drop shadow
Open Flower3 copy paste as new layer add drop shadow
Open Bottle copy paste as new layer add drop shadow
Open Spices copy paste as new layer add drop shadow
Open KitchenTools copy paste as new layer add drop shadow
Open Oil copy paste as new layer resize 50 percent add drop shadow
Open your tube copy paste as new layer add drop shadow
Add your name Font Aquarelle forground #ccb887 background #86141a add drop shadow add gradient glow #86141a
Add your copyright info
Resize & save your tag
If you like this Tut check the boxes below Love to see your results please email to me
Thankyou ♥
Written by ©Lyn(akaAngel) 5th December 2013, any similarity to any other tutorial is purely coincidental!
♥ Gingerbread Christmas ♥

To View Tag In Proper Size Click On The Tag
Supplies Needed
FTU ScrapkitFormer PTU kit now FTU - Ginger Christmas + Cluster Frame Freebie by Amy & Leah
Tube of choice im using Elias Chatzoudis this is a PTU Tube
Mask WSL_Mask84 at weescotslass
Font of choice or the one im using is Buffet Script
Lets Get Started
Open new image 750x700
new raster layer select all Open paper10 copy paste into selection apply mask merge group select none
Open frame5 copy paste as new layer resize 45 percent click in frame with magic wand modify expand by 4
Open paper9 invert delete on keyboard select none drag under frame give frame a drop shadow
Open Tree copy paste as new layer add drop shadow
Open Ginger2 copy paste as new layer add drop shadow
Open Holly copy paste as new layer add drop shadow
Open light pole copy paste as new layer add drop shdow
Open Snowman copy paste as new layer add drop shadow
Open Sign copy paste as new layer resize 35 percent add drop shadow
Open bag copy paste as new layer resize 55 percent add drop shadow
Open Lollipop copy paste as new layer resize 60 percent image rotate 20 percent right add drop shadow
Open your tube copy paste as new layer add drop shadow
Add your name Font Buffet Script forground #94c93d background #cc1f29 add drop shadow add gradient glow #86141a
Add your copyright info
Resize & save your tag
If you like this Tut check the boxes below Love to see your results please email to me
Thankyou ♥
Written by ©Lyn(akaAngel) 5th December 2013, any similarity to any other tutorial is purely coincidental!
♥Thunder Struck ♥

To View Tag In Proper Size Click On The Tag
Supplies Needed
FTU Scrapkit ThunderStruck by Amy & Leah
Tube of choice im using Suzanne Woolcott this is a PTU
Tubes are no longer for sale
Mask WSL_Mask84 at weescotslass
Font of choice or the one im using is Filigree
Lets Get Started
Open new image 750x700
Open paper1 copy paste as new layer apply mask merge group
Open WoodPile copy paste as new layer add drop shadow
Open Tree copy paste as new layer add drop shadow
Open Tornado copy paste as new layer
Open Leafscatter copy paste as new layer add drop shadow
Open BrokenBench copy paste as new layer mirror add drop shadow
Open Bike copy paste as new layer resize 65 percent add drop shadow
Open Rain copy paste as new layer duplicate mirror
Open your tube copy paste as new layer add drop shadow
Add your name Font Filigree forground #ffffff background #ffffff add drop shadow
Add new raster layer fill black merge all visible mirror add border 2 #1c1644
Add your copyright info
Onto Animation
new raster Layer apply Lighting with this setting

copy merge take into animation shop paste as new animation
Go back to psp undo lighting
Redo lighting click random once
copy merge
Go back to animation shop paste after currant frame
Go back to psp undo lighting
redo lighting click random once
copy merge
Go back to animation shop paste after currant frame
Edit select all frame properties 50
Resize & save your tag
If you like this Tut check the boxes below Love to see your results please email to me
Thankyou ♥
Written by ©Lyn(akaAngel) 4th December 2013, any similarity to any other tutorial is purely coincidental!
Without Animation

Without Animation

♥ Just Waiting ♥

To View Tag In Proper Size Click On The Tag
Supplies Needed
PTU Scrapkit Frosty Fun By Vickie
Tube of choice im using Elias Chatzoudis this is a PTU Tube
Mask WSL_Mask84 at weescotslass
Font of choice or the one im using is Before the Rain
Lets Get Started
Open new image 750X700
Open FF-pp16-VS copy paste as new layer apply mask merge group
Open FF-el59-VS copy paste as new layer with selection tool rectangle go around frame
Open FF-el60-VS copy paste as new layer invert delete on keyboard select none add drop shadow to frame
Open FF-el115-VS copy paste as new layer resize 55 percent add drop shadow
Open FF-el17-VS copy paste as new layer resize 45 percent image rotate 90 percent right add drop shadow
Open FF-el13-VS copy paste as new layer resize 25 percent add drop shadow
Open FF-el28-VS copy paste as new layer resize 30 percent add drop shadow
Open FF-el15-VS copy paste as new layer resize 35 percent add drop shadow
Open FF-el18-VS copy paste as new layer resize 25 percent with pick tool slightly slant add drop shadow
Open FF-el19-VS copy paste as new layer add drop shadow
Open FF-el20-VS copy paste as new layer resize 35 percent add drop shadow
Open FF-el27-VS copy paste as new layer resize 35 percent add drop shadow move this behind the cupcake
Add your name Font Before the Rain forground #f0f5f8 background #004992 add gradient glow #004992 & add drop shadow
Add your copyright info
resize & save your tag
If you like this Tut check the boxes below Love to see your results please email to me
Thankyou ♥
Written by ©Lyn(akaAngel) 3rd December 2013, any similarity to any other tutorial is purely coincidental!
♥ Snow Fun ♥

To View Tag In Proper Size Click On The Tag
Supplies Needed
PTU Scrapkit Frosty Fun By Vickie
Tube of choice im using Elias Chatzoudis this is a PTU Tube
Mask WSL_Mask84 at weescotslass
Font of choice or the one im using is Yevida
Lets Get Started
Open new image 750X700
Open FF-pp22-VS copy paste as new layer apply mask merge group
Open FF-el31-VS copy paste as new layer click in frame with magic wand modify expand by 4
Open FF-pp8-VS copy paste as new layer selection invert delete on keyboard select none drag paper under frame add drop shadow to frame
Open FF-el54-VS copy paste as new layer resize 65 percent add drop shadow
Open FF-el49-VS copy paste as new layer resize 65 percent add drop shadow
Open FF-el96-VS copy paste as new layer add drop shadow
Open FF-el121-VS copy paste as new layer add drop shadow
Open FF-el12-VS copy paste as new layer add drop shadow
Open tube copy paste as new layer add drop shadow
Add your name Font Yevida forground #0c5974 background #7bc1f1 add drop shadow
Add your copyright info
resize & save your tag
If you like this Tut check the boxes below Love to see your results please email to me
Thankyou ♥
Written by ©Lyn(akaAngel) 2nd December 2013, any similarity to any other tutorial is purely coincidental!
♥ All Aboard Santa'sTrain ♥

To View Tag In Proper Size Click On The Tag
Supplies Needed
PTU Scrapkit Frosty Fun By Vickie
Mask WSL_Mask84 at weescotslass
Font of choice or the one im using is Miss Fitzpatrick
Lets Get Started
Open new image 750X700
Open FF-pp7-VS copy paste as new layer apply mask merge group
Open FF-el33-VS copy paste as new layer add drop shadow
Open FF-el100-VS copy paste as new layer add drop shadow
Open FF-el111-VS copy paste as new layer
Open FF-el70-VS copy paste as new layer mirror add drop shadow
Open FF-el91-VS copy paste as new layer add drop shadow
Open FF-el107-VS copy paste as new layer resize 45 percent add drop shadow
Open FF-el95-VS copy paste as new layer resize 45 percent add drop shadow
Open FF-el104-VS copy paste as new layer resize 70 percent add drop shadow
Open FF-el121-VS copy paste as new layer resize 35 percent add drop shadow
Add your name Font Miss Fitzpatrick forground #e7292d background #ffffff add gradient glow & add drop shadow
Add your copyright info
resize & save your tag
If you like this Tut check the boxes below Love to see your results please email to me
Thankyou ♥
Written by ©Lyn(akaAngel) 3rd December 2013, any similarity to any other tutorial is purely coincidental!
♥ Summer Time Memories ♥

To View Tag In Proper Size Click On The Tag
Supplies Needed
PTU Scrapkit Almost Summer By Designed by Stina
Tube of Choice im using Dean Yeagle this is a PTU Tube
Here
Here
Mask WSL_Mask84 at weescotslass
Font of choice or the one im using is Fontdinerdotcom Luvable
Lets Get Started
Open new image 650X550
Open DBS_Paper03 copy paste as new layer apply mask merge group
Open DBS_Frame06 copy paste as new layer resize 75 percent image rotate image right 10 percent click in frame with magic wand modify expand by 4
Open DBS_Paper08 copy paste as new layer selection invert delete on keyboard select none drag paperunder frame add drop shadow to frame & tubes
Open DBS_Waves copy paste as new layer resize 45 percent add drop shadow
Open DBS_Dolphin copy paste as new layer add drop shadow
Open DBS_Seahorse01 copy paste as new layer add drop shadow
Open DBS_Bubbles02 copy paste as new layer resize 75 percent duplicate resize 75 percent duplicate again resize 65 percent arrange on tag
Open DBS_Sand02 copy paste as new layer add drop shadow
Open DBS_Lilo01 copy paste as new layer resize 80 percent add drop shadow
Open DBS_Kite copy paste as new layer resize 50 percent add drop shadow
Open DBS_Shell01 copy paste as new layer resize 45 percent add drop shadow
Open DBS_Shell02 copy paste as new layer resize 25 percent add drop shadow
Open tube copy paste as new layer add drop shadow
Open DBS_Shake01 copy paste as new layer resize 25 percent add drop shadow
Open DBS_Birdie01 copy paste as new layer resize 20 percent resize again 50 percent add drop shadow
Open DBS_Umberalla copy paste as new layer resize 75 percent image rotate 30 percent right add drop shadow
Open DBS_aun copy paste as new layer resize 30 percent add drop shadow
Open DBS_PopsicleStick04 copy paste as new layer rotate 90 percent left then rotate 40 percent left add drop shadow
Add your name Font Fontdinerdotcom Luvable forground #dc0f59 background #5ab7f4 add drop shadow
Add your copyright info
resize & save your tag
If you like this Tut check the boxes below Love to see your results please email to me
Thankyou ♥
Written by ©Lyn(akaAngel) 2nd December 2013, any similarity to any other tutorial is purely coincidental!
Subscribe to:
Posts (Atom)


