♥ Welcome ♥

♥ My Blinkie ♥

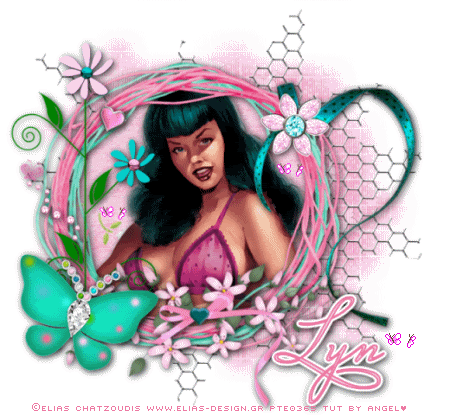
♥ Purple Passion ♥

To View Tag In Proper Size Click On The Tag
Supplies Needed
Scrapkit By Wacky Winnie Designz Called WWD_Purple Passion
PTU Here
Tube of choice im using ©Elias Chatzoudis i brought my license & tube at CILM all hes tubes are at CDO Here
Mask WSL_Mask239 at weescotslass Here
Font of choice or the one i have used Miss Le Gatees
Lets get started
Open WWDPaper10 copy paste as new layer apply mask merge group click in middle of mask with magic wand select modify expand by 10
Open WWDPaper11 copy paste as new layer invert delete on keyboard select none effects texture effect weave with this setting 2,15,100 #ffffff in both boxes
Open WWDDoubleFrame2 copy paste as new layer resize 50 percent
click in each frame with magic wand select all modify expand by 4 open WWDPaper26
Copy paste as new layer invert delete on keyboard dont deselect open your tube
Copy paste as new layer Blend mode Luminance (L)delete on keyboard
with your tube in memory paste as new layer mirror add drop shadow
Open WWDFlowerSpray2 copy paste as new layer resize 70 percent add drop shadow mirror arrange on tag
Open WWDCurlRibbon1 copy paste as new layer resize 70 percent add drop shadow drag this under frame see tag for reference
Add your name Font Miss Le Gatees forground #702b59 Background #d15987 add drop shadow then add gradient glow
Add your copyright info
resize & save your tag
Love to see your results please email to me so i can put in my show off blog

♥ Independence Day ♥

Supplies Needed
Scrapkit 4th of July by Mystic Creations This is PTU can be purchased at Exquisite Scraps
Here
Tube of choice im using ©Keith Garvey i brought my license & tube at MPT all hes tubes are at PTE Here
Mask WSL_Mask84 at weescotslass Here
Font of choice or the one im using is DayDream & Da Vinci Forward
Lets Get Started
Open new image 600x550 transparent
Open MC4JPaper 03 copy paste as new layer resize 20 percent apply mask merge group
Open MC4JRound Frame copy paste as new layer resize 18 percent click in frame with magic wand modify expand by 2
Open copy MC4JPaper 02 resize 10 percent invert delete on keyboard select none add drop shadow to frame
Open MC4JIndependence Word Art 01 copy paste as new layer resize 34 percent add drop shadow
Open MC4JTop Hat 01 copy paste resize 20 percent add drop shadow
Open MC4JStar Pin 01 copy paste as new layer resize 30 percent erase the pin slightly add drop shadow
Open your tube copy paste as new layer drag this under the independence word erase the part overlapping add drop shadow
Add the word Day Font DayDream forground #000000 background #01014c add drop shadow
Add your name Font Da Vinci Forward forground #000000 background #01014c add drop shadow
Add your copyright info
resize & save your tag
Love to see your results please email to me so i can put in my show off blog
Thankyou ♥
Written by ©Lyn(akaAngel) any similarity to any other tutorial is purely coincidental!
♥ Cheeky In Denim ♥

Supplies Needed
Scrapkit Bandana's And Denim by *Krissy's Scraps* This is PTU can be purchased at Exquisite Scraps
Here
Tube of choice im using ©Keith Garvey i brought my license & tube at MPT all hes tubes are at PTE Here
Mask WSL_Mask84 at weescotslass Here
Font of choice or the one im using is DizzyFeiningerSH
Lets Get Started
Open new image 600x550 transparent
Open KSBDPaper 6 copy paste apply Mask merge group
Open KSBDBeaded Swirl 1 copy paste as new layer mirror add drop shadow
Open KSBDRound Beaded Frame 3 copy paste as new layer resize 50 percent Add drop shadow
Open KSBDSafety Pin Charm 2 copy paste as new layer erase little on the pin add drop shadow
Open KSBDPrincess Wrap 1 copy paste as new layer resize 50 percent add drop shadow
Add your name Font Miss Le Gatees forground #000000 background #595384 add drop shadow
Open your tube copy paste as new layer add drop shadow
Add your name & words Cheeky In Denim font DizzyFeiningerSH forground #000000 Background #003852 add drop shadow
Add your copyright info
resize & save your tag
Love to see your results please email to me so i can put in my show off blog
Thankyou ♥
Written by ©Lyn(akaAngel) any similarity to any other tutorial is purely coincidental!
♥ Ready For The Next Bust ♥

To View Tag In Proper Size Click On The Tag
Supplies Needed
Scrapkit by Kim's Korner called Gangsta Love this is PTU Here
Tube of choice im using ©Keith Garvey i brought my license & tube at MPT all hes tubes are at PTE Here
2 Masks WSL_Mask 38 & 84 at weescotslass Here
Font of choice or the one im using is Baby Kruffy & International Palms
Lets Get Started
Open new image 650x550
Open kk_GL_frame 2 copy paste as new layer resize 90 percent with magic wand click in frame selection modify expand by 4
Open kk_GL_Paper24 copy paste as new layer invert delete on keyboard select none drag under frame add drop shadow to frame
Open kk_GL_Paper09 copy paste as new layer apply mask38 merge group
Open kk_GL_bullets copy paste as new layer resize 65 percent add drop shadow
Open kk_GL_money02 copy paste as new layer resize 55 percent add drop shadow
Open kk_GL_CS_wire4 copy paste as new layer apply mask84 merge group drag under frame effects enhance
Open kk_GL_gun copy paste as new layer resize 65 percent add drop shadow
Open kk_GL_Top_Hat01 copy paste as new layer resize 45 percent mirror image rotate 30 left ad gradient glow #db518c & add drop shadow
resize all layers 85 percent
Open tube copy paste as new layer add drop shadow
Add your name Font Baby Kruffys forground #000000 background #db518c effects inner bevel texture effects weave effects inner bevel & add gradient glow #db518c & add drop shadow
Add the words Ready For The Next Bust Font International Palms Forground Null Background #000000 add gradient glow #db518c & drop shadow
Add your copyright info
save your tag as PNG
Love to see your results please email to me so i can put in my show off blog
Thankyou ♥
Written by ©Lyn(akaAngel) 30th June 2011, any similarity to any other tutorial is purely coincidental!
♥ Sweet Spring ♥

To View Tag In Proper Size Click On The Tag
Supplies Needed
Scrapkit by Tonie Posers called Fairy Springtime this is PTU Here
Tube of choice im using ©Elias Chatzoudis at PTE Here
Template56 by Becky this is FTU you can grab it Here
Font of choice or the one im using is LittleRickeyNF
Lets Get Started
Open template duplicate close the original delete preview layer & TOU layer & white background layer
Go To large curly flowers select all float defloat Open tinx_scraps_fairy_spring_time_paper 2 copy paste as new layer select invert delete on keyboard select none
Go To BPcurlyWflowers select all float defloat Open tinx_scraps_fairy_spring_time_paper 2 copy paste as new layer select invert delete on keyboard select none
Go to large circle background select all float defloat Open tinx_scraps_fairy_spring_time_paper 19 copy paste as new layer select invert delete on keyboard select none
Go to small circle background select all float defloat Open tinx_scraps_fairy_spring_time_paper 19 copy paste as new layer select invert delete on keyboard select none
Go to large circle select all float defloat Open tinx_scraps_fairy_spring_time_paper 1 copy paste as new layer select invert delete on keyboard select none
Go to rectangle1 select all float defloat Open tinx_scraps_fairy_spring_time_paper 10 copy paste as new layer select invert delete on keyboard select none
Go to rectangle background select all float defloat Open tinx_scraps_fairy_spring_time_paper 21 copy paste as new layer select invert delete on keyboard Open your tube copy paste as new layer delete on keyboard select none add drop shadow
Go to small circle select all float defloat Open tinx_scraps_fairy_spring_time_paper 10 copy paste as new layer select invert delete on keyboard select none add drop shadow
Go & delete all the original layers of the template
Open tinx_scraps_fairy_spring_time_tree 1 copy paste as new layer resize 135 percent add drop shadow
Open tinx_scraps_fairy_spring_time_mushroom 2 copy paste as new layer add drop shadow
Open tinx_scraps_fairy_spring_time_postbox copy paste as new layer add drop shadow
Open tinx_scraps_fairy_spring_time_snail copy paste as new layer resize 15 percent add drop shadow
Open your tube copy paste as new layer add drop shadow
Add your name & the Words Sweet Spring Font LittleRickeyNF forground #6d9a11 background #f9e33e add gradient glow & add drop shadow
Add your copyright info
resize & save your tag
Love to see your results please email to me so i can put in my show off blog
Thankyou ♥
Written by ©Lyn(akaAngel) 30th June 2011, any similarity to any other tutorial is purely coincidental!
♥ Summer Lovin ♥

To View Tag In Proper Size Click On The Tag
Supplies Needed
Scrapkit by Tootypup Scraps called Summer Lovin this is PTU Here
Mask WSL_Mask 38 at weescotslass Here
Font of choice or the one im using is LD Jilly Nilly
Lets Get Started
Open new image 650x550
Open tp-sand2 copy paste as new layer resize 75 percent add drop shadow
Open tp-paper-13 copy paste as new layer apply mask merge group adjust add remove noise 86 guassian monochrome checked
Open tp-frame-5 copy paste as new layer resize 55 percent add drop shadow
Open tp-grass-4 copy paste as new layer resize 45 percent add drop shadow
Open tp-flowers-4 copy paste as new layer resize 45 percent add drop shadow
Open tp-palmtree-1 copy paste as new layer resize 65 percent add drop shadow
Open tp-poser-medi-1 copy paste as new layer resize 55 percent drag add drop shadow
Open tp-kite1 copy paste as new layer resize 55 percent add drop shadow
Open tp-hat-7 copy paste as new layer resize 15 percent add drop shadow
Open tp-beachbag-2 copy paste as new layer resize 25 percent add drop shadow
Open tp-sun2 copy paste as new layer resize 45 percent add drop shadow
Open tp-seagal-1 copy paste as new layer resize 40 percent add drop shadow
Add your name & the words Summer Lovin Font LD Jilly Nilly Forground #f2d659 Background #ee8d03 add gradient glow add drop shadow
resize & save your tag as PNG
Love to see your results please email to me so i can put in my show off blog
Thankyou ♥
Written by ©Lyn(akaAngel) 30th June 2011, any similarity to any other tutorial is purely coincidental!
♥ Swan Flight ♥

To View Tag In Proper Size Click On The Tag
Supplies Needed
Scrapkit by Darkmoons Dream called Swan Flight this is PTU Here
Mask WSL_Mask84 at weescotslass Here
Font of choice or the one im using is MrBlaketon
Lets Get Started
Open new image 650x550
Open Paper01~SwansFlight~DMD copy paste as new layer apply mask merge group
Open Swirl01~Swansflight~DMD copy paste as new layer resize 55 percent effects enhance
Open Frame07~SwansFlight~DMD copy paste as new layer resize 55 percent with magic wand click in frame selection modify expand by 4
Open Paper19~SwansFlight~DMD copy paste as new layer invert delete on keyboard select none drag under frame add drop shadow to frame
Open Plant01~SwansFlight~DMD copy paste as new layer resize 55 percent add drop shadow
Open Ladybug01~SwansFlight~DMD copy paste as new layer resize 20 percent duplicate flip add drop shadow
Open Branch02~SwansFlight~DMD copy paste as new layer resize 65 percent add drop shadow
Open Swan01~SwansFlight~DMD copy paste as new layer resize 30 percent duplicate resize 65 percent add drop shadow merge down duplicate mirror resize 65 percent blend mode hard light lower opacity 47
Open Lady04~SwansFlight~DMD copy paste as new layer resize 35 percent add drop shadow
Add your name Font MrBlaketon forground #da7104 background #ffffff add gradient glow & add drop shadow
Add your copyright info
resize & save your tag
Love to see your results please email to me so i can put in my show off blog
Thankyou ♥
Written by ©Lyn(akaAngel) 28th June 2011, any similarity to any other tutorial is purely coincidental!
♥ The Belief In Faeries ♥

To View Tag In Proper Size Click On The Tag
Supplies Needed
Scrapkit Angela Kit by Babycakes Scraps this is PTU Here
Template66 by Becky this is FTU you can grab it Here
Mask WSL_Mask24 at weescotslass Here
Word Art By Aussie Scraps Here
Font of choice or the one im using is Copper Alt Caps Expert
Lets Get Started
Open template duplicate close the original canvas size 650 x 600 delete Preview Layer & TOU layer & white background layer
Open bcs soft floral paper copy paste as new layer apply mask merge group duplicate 3 times merge down send this to bottom
Go To paintbrush select all float defloat Open bcs floral paper copy paste as new layer select invert delete on keyboard select none add drop shadow
Go To frame background2 select all float defloat Open bcs distressed floral paper copy paste as new layer select invert delete on keyboard select none
Go to frame background select all float defloat Open bcs floral paper two copy paste as new layer select invert delete on keyboard select none add drop shadow
Go to frame select all float defloat Open bcs floral vine paper copy paste as new layer select invert delete on keyboard select none
Go to large flowers select all float defloat Open bcs floral vine paper copy paste as new layer select invert delete on keyboard select none add drop shadow
Go to medium flowers select all float defloat Open BS_FantasiaBG14 copy paste as new layer select invert delete on keyboard select none add drop shadow
Go to small flowers select all float defloat Open bcs distressed floral paper copy paste as new layer select invert delete on keyboard Open your tube copy paste as new layer delete on keyboard select none add drop shadow
Open bcs blended blossom copy paste as new layer resize 25 percent duplicate arrange on tag add drop shadow
Open bcs golden butterfly copy paste as new layer resize 55 percent mirror add drop shadow
Open bcs tag copy paste as new layer resize 45 percent add drop shadow
Open bcs angela fairy copy paste as new layer resize 64 percent add drop shadow
Open wordart copy paste as new layer resize select all float defloat open bcs floral vine paper invert delete on keyboard select none add gradient glow & drop shadow
Add your name Font Copper Alt Caps Expert forground #ffc766 background #e4bb42 add gradient glow & add drop shadow
Add your copyright info
resize & save your tag
Love to see your results please email to me so i can put in my show off blog
Thankyou ♥
Written by ©Lyn(akaAngel) 28th June 2011, any similarity to any other tutorial is purely coincidental!
♥ Fantasia ♥

To View Tag In Proper Size Click On The Tag
Supplies Needed
Scrapkit by Busy Scrappin called Fantasia this is PTU Here
Tube of choice im using ©Elias Chatzoudis at PTE Here
Template106 by Becky this is FTU you can grab it Here
Mask WSL_Mask84 at weescotslass Here
Font of choice or the one im using is Valeria Script One
Lets Get Started
Open template duplicate close the original canvas size 650 x 600 delete raster1 layer & white background layer
Open BS_FantasiaBG24 copy paste as new layer resize 25 percent apply mask merge group send this to bottom
Go To rectangle scallop select all float defloat Open BS_FantasiaBG06 copy paste as new layer resize 25 percent select invert delete on keyboard select none add drop shadow
Go To rectangle2 select all float defloat Open BS_FantasiaBG04 copy paste as new layer resize 20 percent select invert delete on keyboard select none
Go to circle scallop select all float defloat Open BS_FantasiaBG24 copy paste as new layer resize 25 percent select invert delete on keyboard select none add drop shadow
Go to circle select all float defloat Open BS_FantasiaBG06 copy paste as new layer resize 20 percent select invert delete on keyboard select none
Go to rectangle1 background select all float defloat Open BS_FantasiaBG04 copy paste as new layer resize 25 percent select invert delete on keyboard select none add drop shadow
Go to rectangle1 select all float defloat Open BS_FantasiaBG14 copy paste as new layer resize 20 percent select invert delete on keyboard select none add drop shadow
Go to frame fill select all float defloat Open BS_FantasiaBG10 copy paste as new layer resize 20 percent select invert delete on keyboard Open your tube copy paste as new layer delete on keyboard select none add drop shadow
Go to frame select all float defloat Open BS_FantasiaBG19 copy paste as new layer resize 20 percent select invert delete on keyboard select none add drop shadow
Open BS_Fantasia151 copy paste as new layer resize 20 percent then resize 89 percent add drop shadow
Open BS_Fantasia25 copy paste as new layer resize 20 percent add drop shadow
Open BS_Fantasia32 copy paste as new layer resize 20 percent erase the stem add drop shadow
Open BS_Fantasia122 copy paste as new layer resize 20 percent add drop shadow
Open BS_Fantasia124 copy paste as new layer resize 45 percent mirror add drop shadow
Open BS_Fantasia68 copy paste as new layer resize 20 percent image rotate 15 percent left add drop shadow duplicate mirror
Open BS_Fantasia78 copy paste as new layer resize 25 percent
Add your name Font Valeria Script One forground #7c3872 background #ffffff add gradient glow & add drop shadow
Add your copyright info
resize & save your tag
Love to see your results please email to me so i can put in my show off blog
Thankyou ♥
Written by ©Lyn(akaAngel) 28th June 2011, any similarity to any other tutorial is purely coincidental!
♥ Believing ♥

To View Tag In Proper Size Click On The Tag
Supplies Needed
Scrapkit Firefly Fae By Aussie Scrap Designs this is PTU Here
Template93 by Becky this is FTU you can grab it Here
Mask WSL_Mask84 at weescotslass Here
Font of choice or the one im using is Palace Script MT
Lets Get Started
Open template duplicate close the original canvas size 650 x 600 delete Preview layer & TOU Layer & white background layer
Open Fae_BG4 copy paste as new layer resize 25 percent apply mask merge group send this to bottom
Go To left circle background select all float defloat Open Fae_BG1 copy paste as new layer select invert delete on keyboard select none add drop shadow
Go To left circle lines add drop shadow
Go To rectangle background select all float defloat Open Fae_BG3 copy paste as new layer select invert delete on keyboard select none
Go to rectangle select all float defloat Open Fae_BG2 copy paste as new layer select invert delete on keyboard select none add drop shadow
Go to right circle background select all float defloat Open Fae_BG1 copy paste as new layer select invert delete on keyboard select none
Go to right circle select all float defloat Open Fae_BG4 copy paste as new layer select invert delete on keyboard select none add drop shadow
Go to left side strips background select all float defloat Open Fae_BG7 copy paste as new layer select invert delete on keyboard select none add drop shadow
Go to left side strips select all float defloat Open Fae_BG3 copy paste as new layer select invert delete on keyboard Open your tube copy paste as new layer delete on keyboard select none add drop shadow
Go to scallop select all float defloat Open Fae_BG1 copy paste as new layer select invert delete on keyboard select none add drop shadow
Go to right side strip select all float defloat Open Fae_BG2 copy paste as new layer select invert delete on keyboard select none add drop shadow
Go to right side lines add drop shadow
Open Floral_Leaf_Spray copy paste as new layer add drop shadow
Open Fae_Tree copy paste as new layer mirror Effects Enhance add drop shadow
Open Wordart2 copy paste as new layer effects Enhance add drop shadow
Open Faerie copy paste as new layer resize 20 percent add drop shadow
Add your name Font Palace Script MT forground Null background #ffffff add drop shadow
Add your copyright info
resize & save your tag
Love to see your results please email to me so i can put in my show off blog
Thankyou ♥
Written by ©Lyn(akaAngel) 28th June 2011, any similarity to any other tutorial is purely coincidental!
♥ Happy 4th July ♥

To View Tag In Proper Size Click On The Tag
Supplies Needed
Scrapkit by Randy's Sin called Patriotic Pride Kit this is FTU Here
Tube of choice im using ©Keith Garvey i brought my license & tube at MPT all hes tubes are at PTE Here
Mask WSL_Mask5 at weescotslass Here
Font of choice or the one im using is Cooper Black
Lets Get Started
Open new image 650x550
Open rs_paper7 copy paste as new layer apply mask merge group duplicate merge down Adjust add remove noise 47 random monochrome checked
Open rs_frame4 copy paste as new layer resize 85 percent with magic wand click in frame selection modify expand by 4
Open rs_paper7 copy paste as new layer invert delete on keyboard select none drag under frame add drop shadow to frame
Open rs_eagle1_belle copy paste as new layer resize 65 percent add drop shadow
Open rs_star3 copy paste as new layer resize 25 percent add drop shadow
Open rs_rocket6 copy paste as new layer resize 65 percent add drop shadow
Open rs_startrail2 copy paste as new layer resize 55 percent then resize 85 percent add drop shadow
Open tube copy paste as new layer add drop shadow
Open rs_wa5 copy paste as new layer resize 75 percent add gradient glow & add drop shadow
Add your name Font Cooper Black background #1e234e & #bf282a & #ffffff switch between these colours add gradient glow & add drop shadow
Add your copyright info
resize & save your tag
Love to see your results please email to me so i can put in my show off blog
Thankyou ♥
Written by ©Lyn(akaAngel) 27th June 2011, any similarity to any other tutorial is purely coincidental!
♥ Bad Girl ♥

To View Tag In Proper Size Click On The Tag
Supplies Needed
Scrapkit by Stefs Scrapkit called Bad Lolita this is PTU Here
Tube of choice im using ©Marco Guaglione i brought my license & tube at MPT all hes tubes are at PTE Here
Mask WSL_Mask38 at weescotslass Here
Font of choice or the one im using is Buffet Script
Lets Get Started
Open new image 650x600
Open Paper07_Bad Lolita_Stef'sScrapkits copy paste as new layer apply mask merge group duplicate merge down add remove noise 47 random monochrome checked
Open Frame01_Bad Lolita_Stef'sScrapkits copy paste as new layer resize 75 percent with magic wand click in frame selection modify expand by 4
Open Paper15_Bad Lolita_Stef'sScrapkits copy paste as new layer invert delete on keyboard drag under frame Open Sparkles_Bad Lolita_ Stef'sScrapkits copy paste as new layer delete on keyboard drag under frame select none add drop shadow to frame & Sparkles_Bad Lolita_ Stef'sScrapkits
Open Wordart03_Bad Lolita_Stef'sScrapkits copy paste as new layer resize 25 percent image rotate 15 left add drop shadow
Open Collar_Bad Lolita_Stef'sScrapkits copy paste as new layer resize 35 percent image rotate 15 left add drop shadow
Open Handcuffs_Bad Lolita_Stef'sScrapkits copy paste as new layer resize 33 percent add drop shadow
Open Bottle_Bad Lolita_Stef'sScrapkits copy paste as new layer resize 40 percent add drop shadow
Open tube copy paste as new layer add drop shadow
Add your name Font Buffet Script forground #000000 background #db518c effects inner bevel texture effects weave add gradient glow & add drop shadow
Add your copyright info
resize & save your tag
Love to see your results please email to me so i can put in my show off blog
Thankyou ♥
Written by ©Lyn(akaAngel) 27th June 2011, any similarity to any other tutorial is purely coincidental!
♥ Purple Grunge ♥

To View Tag In Proper Size Click On The Tag
Supplies Needed
Scrapkit by Stefs Scrapkits called Purple Grunge this is PTU Here
Tube of choice im using ©Elias Chatzoudis at PTE Here
Font of choice or the one im using is Bella Donna
Lets Get Started
Open new image 750x600
Open Frame02_PurpleGrunge_Stef'sScrapkits copy paste as new layer resize 50 percent with magic wand click in frame selection modify expand by 4
Open Paper03_PurpleGrunge_Stef'sScrapkits copy paste as new layer invert delete on keyboard select none drag under frame add drop shadow to frame
Open tube copy paste as new layer drag under frame erase any overlapping move to left blend mode Luminance (L) duplicate mirror merge down lower opacity 46
Open Flower07_PurpleGrunge_Stef'sScrapkits copy paste as new layer resize 76 percent add drop shadow
Open Heart05_PurpleGrunge_Stef'sScrapkits copy paste as new layer resize 55 percent add gradient glow & add drop shadow
Open MobilePhone_PaperGrunge_Stef'sScrapkits copy paste as new layer resize 40 percent image rotate 25 left add drop shadow
Open Heart06_PurpleGrunge_Stef'sScrapkits copy paste as new layer resize 66 percent add drop shadow
Open tube copy paste as new layer add drop shadow
Open Wordart01_PurpleGrunge_Stef'sScrapkits copy paste as new layer resize 55 percent add gradient glow & add drop shadow
Open Tag_PurpleGrunge_Stef'sScrapkits copy paste as new layer resize 18 percent erase so looks like ring is going through frame add drop shadow
Add your name Font Bella Donna forground #000000 background #d05e91 add drop shadow
Add your copyright info
resize & save your tag
Love to see your results please email to me so i can put in my show off blog
Thankyou ♥
Written by ©Lyn(akaAngel) 27th June 2011, any similarity to any other tutorial is purely coincidental!
♥ Alice In Wonderland ♥

To View Tag In Proper Size Click On The Tag
Supplies Needed
Scrapkit by Stefs Scrapkits called Alice in Wonderland this is PTU Here
Tube of choice im using ©Nolan Worthington i brought my license & tube at AMI
Mask WSL_Mask84 at weescotslass Here
Font of choice or the one im using is Carlotta
Lets Get Started
Open new image 650x600
Open Element27_AliceinWonderland_Stef'sScrapkits copy paste as new layer apply mask merge group effects enhance
Open Element23_AliceinWonderland_Stef'sScrapkits copy paste as new layer resize 90 percent with magic wand click in frame selection modify expand by 4
Open Paper03_AliceinWonderland_Stef'sScrapkits copy paste as new layer invert delete on keyboard select none drag under frame add drop shadow to frame
Open Element11_AliceinWonderland_Stef'sScrapkits copy paste as new layer resize 85 percent add drop shadow
Open Element34_AliceinWonderland_Stef'sScrapkits copy paste as new layer resize 35 percent add drop shadow
Open Element18_AliceinWonderland_Stef'sScrapkits copy paste as new layer resize 85 percent add drop shadow
Open Element19_AliceinWonderland_Stef'sScrapkits copy paste as new layer resize 45 percent effects Enhance add drop shadow
Open tube copy paste as new layer add drop shadow
Add your name Font Carlotta forground #e55253 background #30a0dd effects inner bevel texture effects weave add gradient glow & add drop shadow
Add your copyright info
resize & save your tag
Love to see your results please email to me so i can put in my show off blog
Thankyou ♥
Written by ©Lyn(akaAngel) 27th June 2011, any similarity to any other tutorial is purely coincidental!
♥ Love In Paris ♥

To View Tag In Proper Size Click On The Tag
Supplies Needed
Scrapkit by Stefs Scrapkits called Love In Paris this is PTU Here
Tube of choice im using ©Elias Chatzoudis i brought my license & tube at MPT all hes tubes are at PTE Here
Mask WSL_Mask84 at weescotslass Here
Font of choice or the one im using is AllisonROB
Lets Get Started
Open new image 650x550
Open Paper05_LoveinParis_Stef'sScrapkits copy paste as new layer apply mask merge group duplicate merge down add remove noise 47 random monochrome checked
Open Element09_LoveinParis_Stef'sScrapkits copy paste as new layer with magic wand click on the frame
Open Paper10_LoveinParis_Stef'sScrapkits copy paste as new layer invert delete on keyboard select none add drop shadow
Open Paper03_LoveinParis_Stef'sScrapkits go back to frame click in middle of frame with magic wand selection modify expand by 4 paste Paper03_LoveinParis_Stef'sScrapkits invert delete on keyboard drag under frame
Open tube copy paste as new layer lower opacity 71 drag under frame add drop shadow
Open Element57_LoveinParis_Stef'sScrapkits copy paste as new layer resize 65 percent add drop shadow
Open Element13_LoveinParis_Stef'sScrapkits copy paste as new layer resize 75 percent add drop shadow
Open Element30_LoveinParis_Stef'sScrapkits copy paste as new layer resize 50 percent add drop shadow
Open Element33_LoveinParis_Stef'sScrapkits copy paste as new layer resize 35 percent add drop shadow
Open Element37_LoveinParis_Stef'sScrapkits copy paste as new layer resize 45 percent add drop shadow
Open Element01_LoveinParis_Stef'sScrapkits copy paste as new layer resize 55 percent image rotate 25 left add drop shadow
Add your name & the words Love in Paris Font AllisonROB forground #000000 background #e6262f add drop shadow
Add your copyright info
resize & save your tag
Love to see your results please email to me so i can put in my show off blog
Thankyou ♥
Written by ©Lyn(akaAngel) 27th June 2011, any similarity to any other tutorial is purely coincidental!
♥ Music is My Life ♥

To View Tag In Proper Size Click On The Tag
Supplies Needed
Scrapkit by RandySins called Two Tons of Steel this is FTU Here
Tube of choice im using ©Elias Chatzoudis i brought my license & tube at MPT all hes tubes are at PTE Here
Mask WSL_Mask38 at weescotslass Here
Font of choice or the one im using is Inspiration
Lets Get Started
Open new image 650x550
Open rs_ttos_paper8 copy paste as new layer apply mask merge group duplicate merge down add remove noise 47 random monochrome checked
Open rs_frame8 copy paste as new layer resize 64 percent with magic wand click in frame selection modify expand by 4
Open rs_ttos_paper1 copy paste as new layer invert delete on keyboard select none drag under frame add drop shadow to frame
Open Candyman_2Tons_Guitar_01 copy paste as new layer resize 47 percent add drop shadow
Open rs_boots2 copy paste as new layer resize 25 percent add drop shadow
Open rs_notes3 copy paste as new layer resize 65 percent add gradient glow & add drop shadow
Open tube copy paste as new layer add drop shadow
Open rs_note11 copy paste as new layer resize 60 percent drag this above the mask layer add drop shadow
Add your name Font Inspiration forground #000000 background ##9c4359 add gradient glow & add drop shadow
Add your copyright info
resize & save your tag
Love to see your results please email to me so i can put in my show off blog
Thankyou ♥
Written by ©Lyn(akaAngel) 27th June 2011, any similarity to any other tutorial is purely coincidental!
♥ Hello Summer ♥

To View Tag In Proper Size Click On The Tag
Supplies Needed
Scrapkit by Nette's Night Owl Works called Summer Feeling this is FTU Here
Mask WSL_Mask84 at weescotslass Here
Font of choice or the one im using is Miss Lankfort
Lets Get Started
Open new image 650x550
Open nnw sfpaper8 copy paste as new layer apply mask merge group
Open nnw sfropeframe copy paste as new layer resize 55 percent with magic wand click in frame selection modify expand by 4
Open nnw sfsea copy paste as new layer invert delete on keyboard select none drag under frame add drop shadow to frame
Open nnw sfpier new raster layer click in frame with magic wand modify expand by 4 copy nnw sfpier paste into selection select none drag under frame add drop shadow
Open nnw sf lighthouse copy paste as new layer resize 55 percent add drop shadow
Open nnw sfshellborder copy paste as new layer resize 65 percent add drop shadow
Open nnw sf boat copy paste as new layer resize 25 percent add drop shadow
Open nnw sfbeachball copy paste as new layer resize 15 percent add drop shadow
Open nnw sfwa copy paste as new layer resize 25 percent add gradient glow & add drop shadow
Open nnw sfmadeline copy paste as new layer resize 45 percent add drop shadow
Add your name Font Miss Lankfort forground #748c80 background #91a89c add gradient glow & add drop shadow
Add your copyright info
resize & save your tag
Love to see your results please email to me so i can put in my show off blog
Thankyou ♥
Written by ©Lyn(akaAngel) 27th June 2011, any similarity to any other tutorial is purely coincidental!
♥ Fairy Kisses ♥

To View Tag In Proper Size Click On The Tag
Supplies Needed
Scrapkit by Stefs Scrapkits called Princess Magic this is PTU Here
Tube of choice im using ©Elias Chatzoudis tubes are at PTE Here
Mask WSL_Mask26 at weescotslass Here
Font of choice or the one im using is Mechanihan Ribbon
Lets Get Started
Open new image 650x550
Open Paper11_PrincessMagic_Stef'sScrapkits copy paste as new layer apply mask merge group merge down duplicate merge down add remove noise 47 random monochrome checked
Open Element39_PrincessMagic_Stef'sScrapkits copy paste as new layer resize 97 percent add drop shadow
Open Element68_PrincessMagic_Stef'sScrapkits copy paste as new layer resize 65 percent with magic wand click in frame selection modify expand by 4
Open Paper10_PrincessMagic_Stef'sScrapkits copy paste as new layer invert delete on keyboard keep select none drag paper add drop shadow to frame
Open Element77_PrincessMagic_Stef'sScrapkits copy paste as new layerdrag under frame add drop shadow
Open Element64_PrincessMagic_Stef'sScrapkits copy paste as new layer resize 75 percent add drop shadow
Open Element22_PrincessMagic_Stef'sScrapkits copy paste as new layer resize 30 percent add drop shadow
Open Element36_PrincessMagic_Stef'sScrapkits copy paste as new layer resize 75 percent duplicate resize 65 mirror take back near the other one merge down add drop shadow
Open Element14_PrincessMagic_Stef'sScrapkits copy paste as new layer resize 30 percent add drop shadow
Open your tube copy paste as new layer add drop shadow
Add your name Font Mechanihan Ribbon forground #c8318c background #ed64a3 add gradient glow & add drop shadow
Add your copyright info
resize & save your tag
Love to see your results please email to me so i can put in my show off blog
Thankyou ♥
Written by ©Lyn(akaAngel) 26th June 2011, any similarity to any other tutorial is purely coincidental!
♥ Butterfly Dream ♥

To View Tag In Proper Size Click On The Tag
Animation tag is at Bottom of Tut
Supplies Needed
Scrapkit by Bubbles Dream called Tutti Frutti this is PTU Here
Tube of choice im using ©Elias Chatzoudis tubes are at PTE Here
Mask WSL_Mask84 at weescotslass Here
Animation Shop
Animation Butterfly at Peachies Collection Here
Font of choice or the one im using is Miss Le Gatees
Lets Get Started
Open new image 650x550
Open Paper9 copy paste as new layer apply mask merge group
Open Element46 copy paste as new layer add drop shadow
Open Element27 copy paste as new layer resize 64 percent with magic wand click in frame selection modify expand by 4
Open paper3 copy paste as new layer invert delete on keyboard keep selected open your tube copy paste as new layer delete on keyboard select none drag paper & tube under frame add drop shadow to frame
Open Element17 copy paste as new layer add drop shadow
Open Element19 copy paste as new layer resize 82 percent add drop shadow
Open Element1 copy paste as new layer resize 58 percent mirror add drop shadow
Add your name Font Miss Le Gatees forground #ee79a2 background #fdd2e5 effects add gradient glow & add drop shadow
Add your copyright info
Copy Merge take this into Animation
right click in middle of tag duplicate frames 14 time so you have 15 frames
Open Butterfly select all Drag onto frame
Go back to butterfly & repeat twice
resize & save your tag
Love to see your results please email to me so i can put in my show off blog
Thankyou ♥
Written by ©Lyn(akaAngel) 25th June 2011, any similarity to any other tutorial is purely coincidental!
♥ Over The Sea ♥

To View Tag In Proper Size Click On The Tag
Supplies Needed
Scrapkit by Stefs Scrapkits called Over The Sea this is PTU Here
Tube of choice im using ©Alain Viesca tubes are at PTE Here
Mask WSL_Mask38 at weescotslass Here
Font of choice or the one im using is LittleRickeyNF
Lets Get Started
Open new image 650x550
Open Paper09_OvertheSea_Stef'sScrapkits copy paste as new layer apply mask merge group
Open Element22_OvertheSea_Stef'sScrapkits copy paste as new layer resize 85 percent with magic wand click in frame selection modify expand by 4
Open Paper09_OvertheSea_Stef'sScrapkits copy paste as new layer invert delete on keyboard select none drag under frame add drop shadow to frame
Open Element65_OvertheSea_Stef'sScrapkits copy paste as new layer resize 35 percent add drop shadow Enhance
Open Element31_OvertheSea_Stef'sScrapkits copy paste as new layer resize 45 percent add drop shadow
Open Element77_OvertheSea_Stef'sScrapkits copy paste as new layer resize 75 percent add drop shadow
Open Element79_OvertheSea_Stef'sScrapkits copy paste as new layer resize 27 percent mirror add drop shadow
Open Element37_OvertheSea_Stef'sScrapkits copy paste as new layer resize 60 percent add drop shadow
Open Element35_OvertheSea_Stef'sScrapkits copy paste as new layer resize 35 percent add drop shadow
Open tube copy paste as new layer add drop shadow
Add your name Font LittleRickeyNF forground #91ccdf background #ffffff add gradient glow & add drop shadow
Add your copyright info
resize & save your tag
Love to see your results please email to me so i can put in my show off blog
Thankyou ♥
Written by ©Lyn(akaAngel) 24th June 2011, any similarity to any other tutorial is purely coincidental!
♥ Good Girl ♥

To View Tag In Proper Size Click On The Tag
Supplies Needed
Scrapkit by Tonie Posers called Casual Elegance this is PTU Here
Template By Tinx this is FTU Here
Tube of choice im using ©Keith Garvey i brought my license & tube at MPT all hes tubes are at PTE Here
Mask WSL_Mask145 at weescotslass Here
Font of choice or the one im using is CK Alis Hand
Lets Get Started
Open Template duplicate close original delete raster 2
Open Casual elegance paper 1 copy paste as new layer resize 120 percent apply mask merge group arrange send to bottom
Go to raster 7 select all float defloat open Casual elegance paper 26 copy paste as new layer resize 120 percent invert delete on keyboard add drop shadow
Go to raster 5 select all float defloat open Casual elegance paper 16 copy paste as new layer resize 120 percent invert delete on keyboard
Go to raster 6 click in each letter of the word with magic wand open Casual elegance paper 20 copy paste as new layer invert delete on keyboard add drop shadow
Go to raster 3 Effects Enhance
Go to raster 4 Effects Enhance
Go To Merged Layer add gradient glow #000000
Go to Copy Merged layer add gradient glow #000000
Open Casual elegance bow 1 copy paste as new layer resize 65 percent add drop shadow
Open Casual elegance flowers 2 copy paste as new layer add drop shadow
Open tube copy paste as new layer add drop shadow
Add your name Font CK Alis Hand forground ##d4aa80 background ##70604c add gradient glow & add drop shadow
Add your copyright info
resize & save your tag
Love to see your results please email to me so i can put in my show off blog
Thankyou ♥
Written by ©Lyn(akaAngel) 20th June 2011, any similarity to any other tutorial is purely coincidental!
♥ Sweet Love ♥

To View Tag In Proper Size Click On The Tag
Supplies Needed
Scrapkit by Stefs scrapkits called Old Scrapkits Now freebies i used the Sweet Love kit for this Tut
this is FTU Here
Tube of choice im using ©Popeye Wong Here
Mask WSL_Mask84 at weescotslass Here
Font of choice or the one im using is Carpenter Script
Lets Get Started
Open new image 650x550
Open Paper13_SweetLove_Stef'sScrapkits copy paste as new layer apply mask merge group
Open Butterfly03_SweetLove_Stef'sScrapkits copy paste as new layer add drop shadow
Open Frame05_SweetLove_Stef'sScrapkits copy paste as new layer resize 65 percent with magic wand click in frames selection modify expand by 4
Open Paper08_SweetLove_Stef'sScrapkits copy paste as new layer invert delete on keyboard select none drag under frame add drop shadow to frame
Open Balloon01_SweetLove_Stef'sScrapkits copy paste as new layer resize 25 percent add drop shadow
Open Cupcake02_SweetLove_Stef'sScrapkits copy paste as new layer resize 40 percent duplicate resize 80 percent add drop shadow
Open Diary_SweetLove_Stef'sScrapkits copy paste as new layer resize 45 percent add drop shadow
Open Pencil_SweetLove_Stef'sScrapkits copy paste as new layer resize 26 percent add drop shadow
Open Male tube copy paste as new layer drag this under frame erase overlapping add drop shadow
Open Main tube copy paste as new layer add drop shadow
Add your name & the words Sweet Love Font Carpenter Script Forground #000000 Background #000000 add gradient glow & add drop shadow
Add your copyright info
resize & save your tag
Love to see your results please email to me so i can put in my show off blog
Thankyou ♥
Written by ©Lyn(akaAngel) 20th June 2011, any similarity to any other tutorial is purely coincidental!
♥ Love Me Love Me Not ♥

To View Tag In Proper Size Click On The Tag
Supplies Needed
Scrapkit by Stefs scrapkits called Old Scrapkits Now freebies i used the Love Me kit for this Tut
this is FTU Here
Tube of choice im using ©Popeye Wong Here
Mask WSL_Mask71 at weescotslass Here
Font of choice or the one im using is Anywhere & Fontdinerdotcom Huggable
Lets Get Started
Open new image 650x550
Open Paper22_LoveMe_Stef'sScrapkits copy paste as new layer apply mask merge group duplicate 3 times
Open Frame02_LoveMe_Stef'sScrapkits copy paste as new layer resize 75 percent with magic wand click in frame selection modify expand by 4
Open Paper14_LoveMe_Stef'sScrapkits copy paste as new layer invert delete on keyboard select none drag under frame add drop shadow to frame
Open Dangler05_LoveMe_Stef'sScrapkits copy paste as new layer resize 40 percent add drop shadow
Open Heart01_LoveMe_Stef'sScrapkits copy paste as new layer resize 55 percent drag under frame add drop shadow
Open Butterfly02_LoveMe_Stef'sScrapkits copy paste as new layer resize 45 percent image rotate 20 right add drop shadow
Open Flower11_LoveMe_Stef'sScrapkits copy paste as new layer duplicate add drop shadow
Open tube copy paste as new layer mirror erase the tail on tube if using same as mine add drop shadow
Add your name Font Fontdinerdotcom Huggable forground #de7a9f background #f4b6b6 add gradient glow & add drop shadow
Add the words Love Me Love Me Not Font Anywhere Forground #ffffff Background #ffffff add drop shadow
Add your copyright info
resize & save your tag
Love to see your results please email to me so i can put in my show off blog
Thankyou ♥
Written by ©Lyn(akaAngel) 20th June 2011, any similarity to any other tutorial is purely coincidental!
♥ Hot Chocolate ♥

To View Tag In Proper Size Click On The Tag
Supplies Needed
Scrapkit by Stefs scrapkits called Old Scrapkits Now freebies i used the Hot Chocolate kit for this Tut
this is FTU Here
Tube of choice im using ©PinupToons at CDO Here
Mask WSL_Mask84 at weescotslass Here
Font of choice or the one im using is dearJoe four
Lets Get Started
Open new image 650x550
Open Paper16_HotChocolate_Stef'sScrapkits copy paste as new layer apply mask merge down
Open Frame04_HotChocolate_Stef'sScrapkits copy paste as new layer resize 75 percent with magic wand click in frame selection modify expand by 4
Open Paper11_HotChocolate_Stef#sScrapkits copy paste as new layer invert delete on keyboard select none drag under frame add drop shadow to frame
Open Wordtart01_HotChocolate_Stef'sScrapkits copy paste as new layer resize 35 percent add drop shadow
Open Wortart02_HotChocolate_Stef'sScrapkits copy paste as new layer resize 35 percent add drop shadow
Open BonBon01_HotChocolate_Stef'sScrapkits copy paste as new layer resize 45 percent image rotate 40 right duplicate with this one image rotate 45 right add drop shadow
Open Papercup01_HotChocolate_Stef'sScrapkits copy paste as new layer resize 25 percent add drop shadow
Open Lollipop01_HotChocolate_Stef'sScrapkits copy paste as new layer resize 15 percent image rotate 15 right erase the stick add drop shadow
Open Lollipop02_HotChocolate_Stef'sScrapkits copy paste as new layer resize 15 percent add drop shadow erase this stick also
Open Stars02_HotChocolate_Stef'sScrapkits copy paste as new layer i didnt resize i just moved over to right & erased the star that was there effects enhance add drop shadow
Open tube copy paste as new layer add drop shadow
Add your name Font dearJoe four forground #000000 background #000000 add gradient glow colour #fbe4bf & add drop shadow
Add your copyright info
resize & save your tag
Love to see your results please email to me so i can put in my show off blog
Thankyou ♥
Written by ©Lyn(akaAngel) 19th June 2011, any similarity to any other tutorial is purely coincidental!
♥ Sexy Is The Word ♥

To View Tag In Proper Size Click On The Tag
Supplies Needed
Scrapkit by Designed By Stina called Wheres The Party this is PTU
Here
Tube of choice im using ©Elias Chatzoudis i brought my license & tube at MPT all hes tubes are at PTE Here
Mask WSL_Mask38 at weescotslass Here
Font of choice or the one im using is P22 Da Vinci Forward
Lets Get Started
Open new image 650x550
Open DBS_Paper16 copy paste as new layer apply mask merge group duplicate merge down
Open DBS_Frame01 copy paste as new layer resize 85 percent with magic wand click in frame selection modify expand by 4
Open DBS_Paper04 copy paste as new layer invert delete on keyboard select none drag under frame add drop shadow to frame
Open DBS_Fireworks01 copy paste as new layer resize 80 percent add drop shadow drag under frame
Open DBS_ConfettiTrumpet01 copy paste as new layer add drop shadow
Open DBS_PearlsOnString02 copy paste as new layer resize 75 percent add drop shadow
Open DBS_Stars01 copy paste as new layer resize 85 percent add drop shadow
Open DBS_WordArt01 copy paste as new layer resize 67 percent add gradient glow & add drop shadow
resize all layers at 85 percent
Open tube copy paste as new layer add drop shadow
Add your name Font P22 Da Vinci Forward forground #000000 background #e12792 add gradient glow & add drop shadow
Add your copyright info
resize & save your tag
Love to see your results please email to me so i can put in my show off blog
Thankyou ♥
Written by ©Lyn(akaAngel) 18th June 2011, any similarity to any other tutorial is purely coincidental!
♥ Color Chrome ♥

To View Tag In Proper Size Click On The Tag
Supplies Needed
Scrapkit by Sweet Southern Comfort Creations called Crazy about Chrome this is FTU Here
Tube of choice im using ©Keith Garvey i brought my license & tube at MPT all hes tubes are at PTE Here
Mask WSL_Mask38 at weescotslass Here
Font of choice or the one im using is Satisfaction
Lets Get Started
Open new image 650x550
Open SSCC_Chrome_paper3 copy paste as new layer apply mask merge group
Open SSCC_Chrome_beaded_wire copy paste as new layer add drop shadow
Open SSCC_Chrome_frame1 copy paste as new layer resize 75 percent with magic wand click in frame selection modify expand by 4
Open SSCC_Chrome_paper7 copy paste as new layer invert delete on keyboard select none drag under frame add drop shadow to frame
5Open SSCC_Chrome_blackNredBfly copy paste as new layer resize 15 percent image rotate 20 right add drop shadow duplicate mirror
Open SSCC_Chrome_wordart1 copy paste as new layer resize 55 percent select all float defloat open SSCC_Chrome_paper2 invert delete on keyboard add gradient glow & add drop shadow
Open SSCC_Chrome_heartbuckleNribbon1 copy paste as new layer resize 75 percent drag under frame erase overlapping add drop shadow
Open SSCC_Chrome_ribbonpin1 copy paste as new layer resize 75 percent add drop shadow
Open tube copy paste as new layer add drop shadow
Add your name Font Satisfaction forground #000000 background #971618 effects add gradient glow & add drop shadow
Add your copyright info
resize & save your tag
Love to see your results please email to me so i can put in my show off blog
Thankyou ♥
Written by ©Lyn(akaAngel) 18th June 2011, any similarity to any other tutorial is purely coincidental!
♥ Pretty Dreams ♥

To View Tag In Proper Size Click On The Tag
Supplies Needed
Scrapkit by cinnamonscraps called Flower Power this is FTU Here
Tube of choice im using ©Zindy Nielson this is FTU Tube Here
Mask WSL_Mask84 at weescotslass Here
Font of choice or the one im using is Inspiration
Lets Get Started
Open new image 650x550
Open CS_flowerpower_paper7 copy paste as new layer apply mask merge group duplicate move to right & down slightly
Open CS_flowerpower_frame1 copy paste as new layer resize 94 percent with magic wand click in frame selection modify expand by 4
Open CS_flowerpower_paper8 copy paste as new layer invert delete on keyboard select none drag under frame add drop shadow to frame
Open CS_flowerpower_callalilliesbundle1 copy paste as new layer resize 74 percent add drop shadow
Open CS_flowerpower_ribbonwrap1 copy paste as new layer resize 74 percent add drop shadow
Open CS_flowerpower_pendant3 copy paste as new layer erase little on the ring add drop shadow
Open CS_flowerpower_flower8 copy paste as new layer resize 80 percent duplicate resize 60 percent add drop shadow
Open tube copy paste as new layer drag under frame add drop shadow
Add your name Font Inspiration forground #b95158 background #dbb7a9 add drop shadow
Add your copyright info
resize & save your tag
Love to see your results please email to me so i can put in my show off blog
Thankyou ♥
Written by ©Lyn(akaAngel) 17th June 2011, any similarity to any other tutorial is purely coincidental!
♥ Fishing Trip ♥
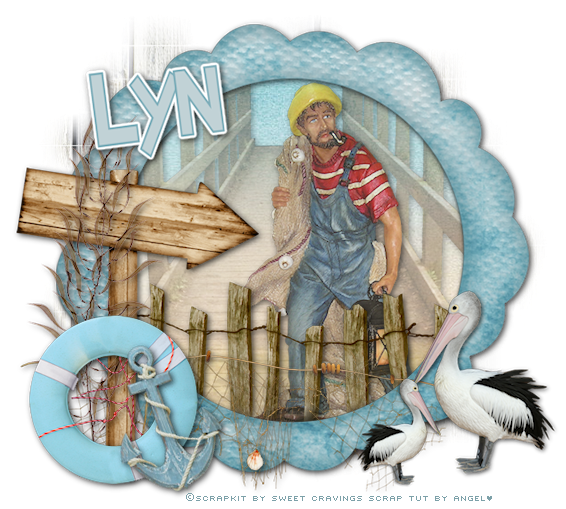
To View Tag In Proper Size Click On The Tag
Supplies Needed
Scrapkit by Sweet Cravings Scraps called Summer Breeze this is PTU Here
Mask WSL_Mask84 at weescotslass Here
Font of choice or the one im using is SF Espresso Shack Condensed
Lets Get Started
Open new image 650x550
Open SCS_SummerBreeze_Paper10 copy paste as new layer apply mask merge group
Open SCS_SummerBreeze_Frame2 copy paste as new layer resize 74 percent with magic wand click in frame selection modify expand by 4
Open SCS_SummerBreeze_Paper6 copy paste as new layer invert delete on keyboard keep selected Open SCS_SummerBreeze_Bridge copy paste as new layer resize 70 percent delete select none drag under frame lower opacity 42 add drop shadow to frame
Open SCS_SummerBreeze_OceanBird2 copy paste as new layer resize 55 percent resize again at 74 percent duplicate resize this one 58 percent add drop shadow to both
Open SCS_SummerBreeze_LifeFloat copy paste as new layer resize 25 percent add drop shadow
Open SCS_SummerBreeze_FishingNet copy paste as new layer resize 68 percent add drop shadow
Open SCS_SummerBreeze_Sign copy paste as new layer add drop shadow
Open SCS_SummerBreeze_Kelp1 copy paste as new layer resize 64 percent add drop shadow
Open SCS_SummerBreeze_BeachFence copy paste as new layer drag this under frame erase overlapping parts add drop shadow
Open SCS_SummerBreeze_SeamanStatue copy paste as new layer resize 75 percent drag this under the fence layer lower opacity 78 percent add drop shadow
Add your name Font SF Espresso Shack Condensed forground #7dadb9 background #c1d2d6 effects add gradient glow & add drop shadow
Add your copyright info
resize & save your tag
Love to see your results please email to me so i can put in my show off blog
Thankyou ♥
Written by ©Lyn(akaAngel) 17th June 2011, any similarity to any other tutorial is purely coincidental!
♥ For Me ♥

To View Tag In Proper Size Click On The Tag
Supplies Needed
Scrapkit by Sweet Cravings Scraps called Crush this is PTU Here
Tube of choice im using ©Keith Garvey i brought my license & tube at MPT all hes tubes are at PTE Here
Font of choice or the one im using is StarlightHotel
Lets Get Started
Open new image 650x550
Open SCS_Crush_Frame1 copy paste as new layer resize 74 percent with magic wand click in frame selection modify expand by 4
Open SCS_Crush_Paper16 copy paste as new layer invert delete on keyboard select none drag under frame texture effects weave 2 11 4 #000000 in both boxes filled gaps checked add drop shadow to frame
Open SCS_Crush_LeafStems copy paste as new layer add drop shadow
Open SCS_Crush_Flower5 copy paste as new layer resize 68 percent mirror add drop shadow
Open SCS_Crush_Flower6 copy paste as new layer resize 54 percent mirror add drop shadow
Open SCS_Crush_Ribbon5 copy paste as new layer duplicate drag this one under above the frame go back to top ribbon erase little see my tag for reference add drop shadow
Open tube copy paste as new layer add drop shadow
Add your name Font StarlightHotel forground #ffb9a6 background #fd2f9d effects inner bevel texture effects weave add gradient glow & add drop shadow
Add your copyright info
resize & save your tag
Love to see your results please email to me so i can put in my show off blog
Thankyou ♥
Written by ©Lyn(akaAngel) 17th June 2011, any similarity to any other tutorial is purely coincidental!
♥ Stardrop Surprise ♥

To View Tag In Proper Size Click On The Tag
Supplies Needed
Scrapkit by Tonie Posers called Stardrop Surprise this is PTU Here
Tube of choice im using ©Elias Chatzoudis i brought my license & tube at MPT all hes tubes are at PTE Here
Mask WSL_Mask84 at weescotslass Here
Font of choice or the one im using is Snotmaster V
Lets Get Started
Open new image 650x550
Open tinx_scraps_star drop_surprise paper 13 copy paste as new layer apply mask merge group
Open tinx_scraps_star drop_surprise doodle copy paste as new layer duplicate mirror flip merge down add drop shadow
Open tinx_scraps_star drop_surprise frame 1 copy paste as new layer image rotate 40 left resize 80 percent with magic wand click in frame selection modify expand by 4
Open tinx_scraps_star drop_surprise paper 10 copy paste as new layer invert delete on keyboard keep selected Open tinx_scraps_star drop_surprise purple gems copy paste as new layer resize 54 percent delete on keyboard select none drag under paper & gems under frame add drop shadow to frame
Open tinx_scraps_star drop_surprise star 2 copy paste as new layer resize 10 percent duplicate resize this one at 76 percent add drop shadow
Open tube copy paste as new layer add drop shadow
Add your name Font Snotmaster V forground #000000 background #b949fc add drop shadow
Add your copyright info
resize & save your tag
Love to see your results please email to me so i can put in my show off blog
Thankyou ♥
Written by ©Lyn(akaAngel) 17th June 2011, any similarity to any other tutorial is purely coincidental!
♥ Fresh ♥

To View Tag In Proper Size Click On The Tag
Supplies Needed
Scrapkit by cinnamonscraps called Fresh this is FTU Here
Tube of choice im using ©Henri Peter this is FTU Here
Mask WSL_Mask38 at weescotslass Here
Font of choice or the one im using is Impact & Valeria Script Two
Lets Get Started
Open new image 650x550
Open CS_fresh_paper12 copy paste as new layer apply mask merge group
Open CS_fresh_frame5 copy paste as new layer resize 80 percent with magic wand click in frame selection modify expand by 4
Open CS_fresh_paper11 copy paste as new layer invert delete on keyboard open tube copy paste as new layer delete on keybord select none drag tube & paper under frame duplicate tube drag this above frame add drop shadow to frame & tube
Open CS_fresh_doodle2 copy paste as new layer drag under frame add drop shadow
Open CS_fresh_bow4 copy paste as new layer resize 70 percent add drop shadow
Open CS_fresh_embroideredblossoming1 copy paste as new layer resize 67 percent mirror add drop shadow
Open CS_fresh_tag1 copy paste as new layer resize 76 percent add drop shadow
Add the word Fresh Font Impact forground #ba2a3f background #d2b077 add drop shadow
Add your name Font Valeria Script Two forground #ba2a3f background #d2b077 add drop shadow
Add your copyright info
resize & save your tag
Love to see your results please email to me so i can put in my show off blog
Thankyou ♥
Written by ©Lyn(akaAngel) 16th June 2011, any similarity to any other tutorial is purely coincidental!
♥ Pretty As A Picture ♥

To View Tag In Proper Size Click On The Tag
Supplies Needed
Scrapkit by cinnamonscraps called bashful this is FTU Here
Tube of choice im using ©Sara Moon Here
Mask WSL_Mask84 at weescotslass Here
Font of choice or the one im using is Voluta Script Pro
Lets Get Started
Open new image 650x550
Open CS_bashful_paper8 copy paste as new layer apply mask merge group
Open CS_bashful_frame1 copy paste as new layer resize 58 percent with magic wand click in frame selection modify expand by 4
Open CS_bashful_paper10 copy paste as new layer invert delete on keyboard select none drag under frame add drop shadow to frame
Open CS_bashful_flower4 copy paste as new layer resize 57 percent add drop shadow
Open tube copy paste as new layer drag this under frame duplicate put this one above frame erase slightly what is overlapping add drop shadow to bottom tube
Open CS_bashful_blossoms1 copy paste as new layer resize 75 percent add drop shadow
Open CS_bashful_butterfly1 copy paste as new layer resize 75 percent add drop shadow
Add your name & the words Pretty As A Picture Font Voluta Script Pro forground #866677 background #87aea2 add gradient glow & add drop shadow
Add your copyright info
resize & save your tag
Love to see your results please email to me so i can put in my show off blog
Thankyou ♥
Written by ©Lyn(akaAngel) 16TH June 2011, any similarity to any other tutorial is purely coincidental!
♥ Summer Time ♥

To View Tag In Proper Size Click On The Tag
Supplies Needed
Scrapkit by Stefs Scrapkits called Summer Breeze this is FTU Here
Tube of choice im using ©Keith Garvey i brought my license & tube at MPT all hes tubes are at PTE Here
Mask WSL_Mask84 at weescotslass Here
Font of choice or the one im using is Sissyneck
Lets Get Started
Open new image 650x550
Open Paper01_SummerBreeze_Stef'sScrapkits copy paste as new layer apply mask merge group
Open Ele23_SummerBreeze_Stef'sScrapkits copy paste as new layer mirror add drop shadow
Open Ele09_SummerBreeze_Stef'sScrapkits copy paste as new layer resize 65 percent mirror add drop shadow
Open Ele26_SummerBreeze_Stef'sScrapkits copy paste as new layer resize 54 percent add drop shadow
Open Ele27_SummerBreeze_Stef'sScrapkits copy paste as new layer resize 30 percent image rotate 20 left add drop shadow
Open Ele11_SummerBreeze_Stef'sScrapkits copy paste as new layer add drop shadow
Open tube copy paste as new layer add drop shadow
Add your name Font Sissyneck forground #72b653 background #6f0301 effects inner bevel texture effects weave add gradient glow & add drop shadow
Add your copyright info
resize & save your tag
Love to see your results please email to me so i can put in my show off blog
Thankyou ♥
Written by ©Lyn(akaAngel) 16th June 2011, any similarity to any other tutorial is purely coincidental!
♥ Strangers in the Night ♥

To View Tag In Proper Size Click On The Tag
Supplies Needed
Scrapkit by Sweet Cravings Scraps called Strangers in the Night this is PTU Here
Tube of choice im using ©Keith Garvey i brought my license & tube at MPT all hes tubes are at PTE Here
Mask WSL_Mask225 at weescotslass Here
Font of choice or the one im using is Buffet Script
Lets Get Started
Open new image 650x550
Open SCS_StrangersInTheNight_Paper16 copy paste as new layer apply mask merge group
Open SCS_StrangersInTheNight_Frame6 copy paste as new layer resize 75 percent with magic wand click in frame selection modify expand by 4
Open SCS_StrangersInTheNight_Paper4 copy paste as new layer invert delete on keyboard open your tube copy paste as new layer delete on keyboard select none drag tube & frame under frame add drop shadow to frame
duplicate tube adjust blur guassin blur 17 then drag this under the tube then i did a texture effect to it
Open SCS_StrangersInTheNight_Moon&Cloud copy paste as new layer resize 64 percent drag under frame add drop shadow
Open SCS_StrangersInTheNight_Vine copy paste as new layer keep this under frame add drop shadow
Open SCS_StrangersInTheNight_Candle4 copy paste as new layer resize 55 percent duplicate resize again at 55 percent add drop shadow
Open main tube copy paste as new layer add drop shadow
Add your name & the words Strangers In The Night Font Buffet Script forground #9c3813 background #000000 add drop shadow then add gradient glow
Add your copyright info
resize & save your tag
Love to see your results please email to me so i can put in my show off blog
Thankyou ♥
Written by ©Lyn(akaAngel) 11th June 2011, any similarity to any other tutorial is purely coincidental!
♥ Problem Child ♥

To View Tag In Proper Size Click On The Tag
Supplies Needed
Scrapkit by Sweet Cravings Scraps called Problem Child this is PTU Here
Mask WSL_Mask38 at weescotslass Here
Font of choice or the one im using is KidzOnlyTooSSK
Lets Get Started
Open new image 650x550
Open SCS_ProblemChild_Paper16 copy paste as new layer apply mask merge group duplicate merge down add remove noise 47 random monochrome checked
Open SCS_ProblemChild_Frame4 copy paste as new layer resize 79 percent with magic wand click in frame selection modify expand by 4
Open SCS_ProblemChild_Paper1 copy paste as new layer invert delete on keyboard select none drag under frame add drop shadow to frame
Open SCS_ProblemChild_Grass copy paste as new layer add drop shadow
Open SCS_ProblemChild_Moon1 copy paste as new layer resize 55 percent add drop shadow
Open SCS_ProblemChild_SpiderCharm copy paste as new layer add drop shadow
Open SCS_ProblemChild_RockPath copy paste as new layer resize 82 percent drag under frame add drop shadow
Open LDHanna1 poser this is included in the kit copy paste as new layer resize 75 percent add drop shadow
Open SCS_ProblemChild_OldTricycle copy paste as new layer resize 55 percent add drop shadow
Add your name Font KidzOnlyTooSSK forground #ffffff background #000000 add drop shadow
Add your copyright info
resize & save your tag
Love to see your results please email to me so i can put in my show off blog
Thankyou ♥
Written by ©Lyn(akaAngel) 11th June 2011, any similarity to any other tutorial is purely coincidental!
♥ Oh Those Safari Nights ♥

To View Tag In Proper Size Click On The Tag
Supplies Needed
Scrapkit by TootyPup called Safari Nights this is PTU Here
Mask WSL_Mask251 at weescotslass Here
Font of choice or the one im using is Barrista
Lets Get Started
Open new image 650x550
Open tp-paper-8 copy paste as new layer apply mask merge group
Open tp-grass-6 copy paste as new layer resize 23 percent add drop shadow
Open tp-safariNights-13 copy paste as new layer resize 55 percent add drop shadow
Open tp-grass-1 copy paste as new layer resize 58 percent add drop shadow
Open tp-elephants-3 copy paste as new layer resize 35 percent add drop shadow
Open tp-Panther-2 copy paste as new layer resize 30 percent add drop shadow
Open tp-lamp-1 copy paste as new layer resize 5 percent duplicate 3 times arrange on tag see mine for reference add drop shadow
Add your name & the words oh those Safari Nights Font Barrista forground #c4b9a1 background #3f2f17 add drop shadow
Add your copyright info
resize & save your tag
Love to see your results please email to me so i can put in my show off blog
Thankyou ♥
Written by ©Lyn(akaAngel) 11th June 2011, any similarity to any other tutorial is purely coincidental!
Subscribe to:
Posts (Atom)


